About Joshua Mathew

I'm a junior in the College of Business, double majoring in Information Systems & Information Technology and Business Process Management.

Week 12 Reflection

Although I strolled into class a few minutes late, I was able to catch the remainder of the lecture presented by Indiana University’s Makerspace director. It’s really cool to see more areas conducive in instilling a sense of creativity within students open up in colleges around the nation. After the lecture, I was left with an immense sense of pride in the University of Illinois for creating the world’s first business school 3D printing lab. A place in which I, along with many of my fellow Illini, have utilized and continue to do so as a creative hub for various projects and personal endeavors. Particularly, I got to hear how my classmates have used the MakerLab and other resources on campus to help bring their projects to life. I was astonished by the creativity, ingenuity, and passion behind each groups’ progress report.

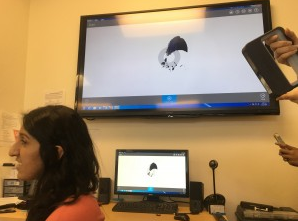
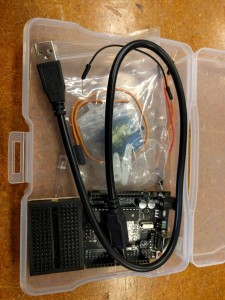
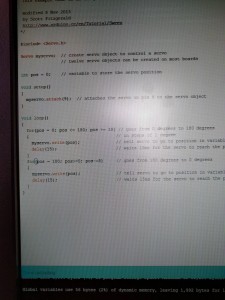
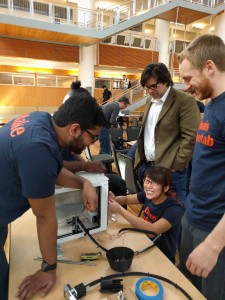
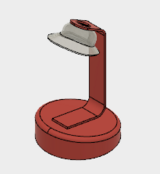
After each group presented a snippet of their project, we were left to stay in the MakerLab, go to the FabLab, or utilize any other resource to help aide the progression of our project. Since the Arduino is the base of our product, we went to the FabLab. During our time at the FabLab, we learned a lot more about the functionality of the ukulele tuner and made slight adjustments to our existing project. As Annie was heavily researching the Arduino facet of our project, I assisted Johnny in creating the outer piece of the tuner on Fusion 360. The process was quite tricky, but we are now one step closer to where we want to be in terms of design.

In the near future, I look forward to 3D printing the outer piece of the tuner and seeing it completed! Not to mention, I am beyond pumped to see my fellow classmates’ finished products. Also, I hope to continue utilizing the MakerLab and other resources on campus for future projects. Lastly, after having slight difficulty navigating Fusion 360, I want to create more objects to become fully proficient with the software.

Week 11 Reflection

After what seemed like forever, it was nice to be back in the place where our 3D printing journey began, the MakerLab. Looking around the room, I was reminded of how far I’ve come in this journey. From barely knowing anything about 3D printing to accumulating this wealth of knowledge on the subject matter, it’s safe to say that I felt a strong sense of accomplishment. For this past week’s class, we had the opportunity to utilize the scanners. Fortunately, during the Build-A-Printer event, I dabbled with the iSense scanners and gained some first-hand experience using them.

Although I didn’t partake too much in scanning, I thoroughly enjoyed watching how people interacted with the scanners. It reminded me of the issues I had with scanning from earlier at the Build-A-Printer event. To get an accurate scan, it’s imperative to be patient and steady. Regrettably, I didn’t take any photos in this past week’s session, but enjoy this photo of one of my classmates getting scanned! Also, although the scanner is somewhat made out in the photo featuring my peer, here is a picture I found online that will give you a closer, in-depth look of this unique tool. Check out both of these pictures below!

Screen Shot 2016-04-17 at 7.00.17 PMScreen Shot 2016-04-17 at 7.01.38 PM

As people continued struggling to perfect their scans, a few of us started playing around with Autodesk’s MeshMixer, which is an extremely cool, state-of-the-art software for working with triangle meshes. The features offered through this software are endless, ranging from 3D sculpting and surface stamping to remeshing and mesh simplification. However, our class mainly utilized this software to smooth out the rough edges of a print. This portion of class was taught by Arielle Rausin, who was kind enough to show us how to use the basic features of this software!

I believe this software will come in handy in the future for a variety of reasons. The most important being that it allows for existing objects to be modified at the discretion of the user. All of the unique facets we learned from the previous class can be applied to my group’s semester project. It’s going to be awesome to see how these newly acquired skills and traits help bring our product to life! I hope to continue dabbling with MeshMixer and perfect the art of scanning.

Week 10 Reflection

This past week’s class marked our third and final session in Champaign-Urbana’s Fab Lab. After completing the embroidery and laser-cutting workshops previously, I was lucky enough to have the Arduino workshop as my last rotation. Funnily enough, this workshop was the most relevant to my semester project since it requires the use of an Arduino.

At first, I was extremely excited to assemble an Arduino! However, this feeling of excitement quickly dissipated as soon as this was handed to me:

Arduino


The kit made me extremely nervous! It looked quite complicated. Luckily, one of my friends provided me with the guidance I needed in order to assemble the Arduino. To my surprise, It wasn’t as difficult as I thought it would have been. In fact, I became fascinated by the whole functionality of the Arduino. From a software perspective, I thought it was really cool how minor changes in the the programming language amounted in changes to the Arduino itself. For example, if I increased the delay on a line of code and re-uploaded it, the Arduino would take on these changes. Check it out below!

language


All in all, I really enjoyed this past week’s session at the Fab Lab! It drove my interest in coding by a great deal. Going forward, I hope to use this newfound knowledge and fascination towards my semester project. After this workshop, my group members and I have a better idea as to how to go about bringing it to life.

Class Summary: Build a Printer Event

For this past week’s class, the main objective was to learn and gain as much hands-on experience from the 3D Printing Expo. To accomplish this objective, students chose to partake in certain sessions of the event. Specifically, these sessions were assembling a 3D printer from the Ultimaker kit, upgrading the Ultimaker 2 to the Ultimaker 2+, and scanning of individuals’ heads to be 3D printed. Students, along with the help of an Ultimaker representative, had to work together in order to complete these tasks. By the end of the event, students gained a variety of skills from the workshop such as team building and critical thinking. Although the 3D printer wasn’t fully assembled from the kit, the Ultimaker 2 from the Illinois MakerLab was fully upgraded to the Ultimaker 2+. As for the scanning session, there wasn’t a completed 3D printed object in the time allotted for the event. The reason as to why these two sessions were left incomplete is simply because they require a lot more time. All in all, students worked really hard during the event and thoroughly enjoyed it. Check out some of the stills from this past week’s event below!PicScreen Shot 2016-04-03 at 6.10.13 PMPic 3Screen Shot 2016-04-03 at 10.29.00 PMScreen Shot 2016-04-03 at 6.11.34 PM

Clearly, the students were engrossed in completing their tasks. Here are some quotes from students in regards to the event!

“It seemed like a mission impossible for us due to lack of experience on assembling, but we never lacked teamwork between each stage.” -Ran Jin

Week 9 Reflection-building a 3D printer

“Prior to this experience, I did not really understand how 3D printers worked and how all the components fit together. After taking one apart, and putting it back together successfully, I have a much better understanding of how these components fit together.” -Reid Dahlstrom

Week #9 – Ultimaker 2 Upgrade!

Check out all of the other students’ responses to this event by clicking here. Also, if you’re interested in learning more about the Ultimaker, check out a few of the links listed below:

  • https://ultimaker.com/
  • https://www.youtube.com/user/Ultimaker3D
  • https://twitter.com/Ultimaker

Week 9 Reflection

During this past week, we had the unique opportunity to partake in the 3D Printing Expo. Going in, I was both excited and nervous. The thought of building something in the BIF atrium where everyone could see us was quite nerve-racking. However, it seemed really cool simultaneously. For the event, there were 3Different (see what I did there?) sections: assembling a 3D printer, upgrading an Ultimaker, and scanning. Check them out below!

Pic 3PicPic 2

I thought it would be really cool to assemble a 3D printer, so that’s what I chose to do! Before our group began assembling the 3D printer, the Ultimaker representative told us, “It’s kind of like assembling something from Ikea.” This statement couldn’t be further from the truth. Our group had great difficulty assembling the printer in the beginning. A lot of the problems stemmed from the fact that the instructions were outdated. Also, there comes a point where there are simply too many people working on something that requires only a few individuals. I recognized this and used it as an opportunity to explore the other sections.

All in all, I learned quite a bit from the 3D Printing Expo. It taught me to be cooperative, diligent, and optimistic. Although I already knew of the importance of teamwork, it was reemphasized through this activity. Also, through assembling the Ultimaker, I learned a lot more about the functionality of the 3D printer. Lastly, going forward, it would be awesome to assemble more 3D printers and learn how to upgrade them as well.

Week 7 Reflection: CU Fab Lab Pt. 2

Before this past week’s session, I wanted to research more about the three different areas of CU’s Fab Lab. As I was perusing through their website, I found great resources to further my knowledge on the Fab Lab. In fact, CU’s Fab Lab has a YouTube channel! Check out their awesome videos here. After utilizing these outlets to learn more, I was more than thrilled to head back!

For the first workshop, I was placed in the embroidery area amongst several of my classmates. We learned the basic functions of the software and how to thread the sewing machine. For this past week’s workshop, our group relocated to the laser-cutting/design area. Duncan, who is employed at CU’s Fab Lab, lead our workshop. He ran through how to properly utilize the Inkscape software, the two types of laser engravers, and the differences between rastering and cutting.

I was having difficulty finding a design to raster onto a notebook. So, I decided to walk around and see what cool things my classmates were up to in order to gain some inspiration! By doing this, I got some great advice from Gwen, who told me to keep the design minimalistic and simple. In the end, this is what I chose to design:

Screen Shot 2016-03-13 at 9.09.40 PM

I shared a picture of my newly-designed notebook via Twitter and received positive feedback. Check out one of the responses below:

Screen Shot 2016-03-13 at 7.26.21 PM

This interaction led me to think about a variety of things such as personalized design/customization, production, and mass markets. Going forward, I hope to continually visit CU’s Fab Lab and expand my knowledge on all of its facets.


Week 6 Reflection: CU Fab Lab Pt. 1

As I looked up from my phone’s GPS, I confusingly stared at the building ahead. I couldn’t help but wonder if this was it. I made my way around the building to the main entrance and was immediately greeted by a white, hefty door with the words Fab Lab written on it. This was it. I didn’t expect much going in solely because of the building’s unimpressive appearance, but you know what they say? Appearances can be deceiving and this idiom rings especially true for Champaign Urbana’s Fab Lab. Needless to say, they put the “fab” in fabulous.

The Fab Lab, which is short for Fabrications Laboratory, is divided into three unique sections:  fabrications, electronic resources, and design. Before we toured the entire building, we were given a brief presentation as to what the Fab Lab does. Its mission is to provide an open and collaborative environment for makers to imagine, design, and create using open source software and DIY equipment. As soon as the presentation concluded, our class was divided into two groups to tour each workspace in its entirety. There were so many vastly different, cool items found in each respective section! However, there was one item that specifically caught my eye, which can be found below:

Car

Once the tour finished, groups were assigned to different workstations. Fortunately, I was placed into the fabrications section, which meant that I got to walk out of class with a custom-made, embroidered item! After perusing online, I chose to design a film camera. However, there were various modifications that had to be made on it. I condensed the image into five colors and thickened the lines to create distinguished segments of the piece. Now, it was ready to go! Check out the video below of my design getting embroidered onto the fabric:


By learning the embroidering process, I can create and modify objects to my liking. This can be especially useful in creating logos that can be sewn onto various types of clothing. Overall, the experience has proven to be quite challenging and fun! I’ve gained technical skills from playing around with the modifying software, which may come in handy in the near future. Now, I want to expand my knowledge of embroidery and fabrications. I want to continue dabbling into this newfound interest of mine! Hopefully, I can do so in next week’s class.

Week 5 Reflection

Over the past two classes, students had the unique opportunity to gain hands-on experience with Fusion 360. Unfortunately, my initial encounter with the software was delayed because my laptop wouldn’t allow me to download the software until I installed updates. However, I thoroughly enjoyed listening to Autodesk’s Lucas Ewing on Monday, February 15th. Although interesting, I found it quite difficult to keep up with Ewing’s lecture on Fusion 360. Later that week, I played around with the software on my own and quickly became frustrated. I had no idea what I was doing!

During next Monday’s class, my frustration with Fusion 360 began to dissipate after Gina Taylor and Nicole Chimienti’s tutorial on how to construct a lamp.  Even though I had to continually ask for help from both the lecturers and my peers, I became a lot more confident in my ability to design using the Fusion 360 software. By the end of class, I ended up with a pretty sweet-looking lamp. Check it out below!

Screen Shot 2016-02-27 at 3.25.05 PM

Through the use of the render tool, I changed the material of the lamp as well as its color. To me, this is one of the coolest features Fusion 360 has to offer. Once class was over, I was left contemplating different ideas on how to move forward with this newfound knowledge. The impact this software can make on one’s life is astounding. Now, I have the ability to tweak existing products to my personal liking. On a much larger level, however, I want to design innovative products that can help alleviate the human condition such as a purifying straw. My hope would be to have this product mass produced and available to individuals who don’t have access to clean water. Before I can aspire to this, I need to become well versed with Fusion 360. My short-term goal is to use this software to create relatively easy, generic objects and work my way up until I’m proficient.

The importance of the Fusion 360 software is significant. It serves as a platform that enables individuals to design almost anything. My experience with Fusion 360 has expanded my narrow mindset into an open abyss of endless possibilities.

Week 3: Design For America Workshop

As the second class in the MakerLab was wrapping up, Professor Sachdev quickly announced that next week’s class will feature a Design For America workshop. Intrigued, I looked at the syllabus for clues as to what this workshop would entail. Unfortunately, there wasn’t an explicit statement in Week 3’s section regarding the upcoming workshop. However, after reading the article entitled Design Thinking by Tim Brown, I had a better idea of what to expect. In the article, Brown discusses what design is and how it’s functionality has expanded significantly. Through design thinking, Brown was able to “reengineer nursing-staff shift changes at four Kaiser hospitals,” which resulted in “more time for nursing, better-informed patient care, and a happier nursing staff.” All in all, I became heavily interested in the design process and couldn’t wait for the third week of class!

Design For America (DFA), the University of Illinois chapter, hosted a fun and innovative workshop this past Monday. The four representatives of DFA came from various colleges, ranging from the College of Engineering to the College of Media. According to them, DFA thrives off of its diversity because it allows for different ways of thinking, skill sets, and opinions. Once introductions finished, DFA asked the class to break up into pairs to complete an entertaining, introductory activity. The warm-up involved creating letters with our physical body and it couldn’t have been a better way to prepare us for the workshop’s main activity. Once our creative juices were flowing, DFA presented the class with four cases. Each of which involved individuals suffering from a visual impairment. After these cases were presented, the class broke up into teams of four in order to come up with a solution for one of the visually impaired individuals. In different stages, our group had to make assumptions about our case individual, think of the core issues at hand, and lastly, create an innovative product.

After completing the workshop, my outlook on design has completely changed. Going in, I thought of design as purely aesthetic. Now, I realize it’s much more than that. The workshop required me to forgo of past notions I’ve had of the design process. For example, I was completely taken aback by when they said it’s imperative to make assumptions of each case. I had to let go of the idea that making assumptions is faulty. DFA’s workshop is pertinent to the way industries create new products because it requires a deep level of thinking and creativity. This experience has taught me to not think outside of the box, but to break it. In essence, the DFA workshop has instilled a sense of defiance against the conventional thought and design processes.

I can apply this newfound knowledge to many facets of my own life, especially the work field. I will be able to integrate this concept of design thinking into my role as a Product Management Intern for the upcoming summer. Aside from its relevance in my life, the DFA workshop opened my eyes to the plethora of products that haven’t been made that can potentially alleviate the human condition.


Week 2: My First 3D Printing Session

Before walking into the MakerLab this past Monday, I needed to get into the right mindset. Specifically, I needed to get into the Maker Mindset. Puns aside, I was absolutely intrigued by Dale Dougherty’s The Maker Mindset. It never dawned on me that I was a part of this so-called “Maker Movement.” By simply taking this class, I have signed up to join this movement, which requires me to forgo conventional methods of ideating and creating.

In class, that is exactly what we did: ideate and create.

However, before we could use the 3D printers to create our ideas, it was required of students to meet with their groups to peruse through various 3D printing-related websites. The two different websites that my team had to explore were Shapeways and MyMiniFactory. Both of these sites shared a common thread, they allowed for makers to share their unique ideas and receive feedback on their products. I got a true sense of community from both Shapeways and MyMiniFactory! Also, I learned of some very cool and useful products that were being shared on these sites.

Although there were a plethora of useful products to choose from, I had to limit myself to four objects that could be used in my everyday life. In no particular order, these products are listed below:

Remote Holder – https://www.myminifactory.com/object/holder-remote-control-10234 

Back at home, I have at least 4 different kinds of remotes. Instead of having to waste time looking for a particular remote, it would be nice to have a singular location for all of them. Hence, the remote holder. The design can be customized to fit the varied sizes of the remotes.

Toothbrush Cover – https://www.myminifactory.com/object/toothbrush-cover-9426

If you’re a germaphobe like me, you might want to invest in a toothbrush cover. The thought of using a dirty toothbrush is quite repulsive. The cap can be designed to fit the specific shape of the head of the toothbrush.

Power Cable Clip – https://www.myminifactory.com/object/power-cable-clip-3438

I’m constantly tripping over different cables and wires, so it would be nice to invest in one of these power cable clips. In my apartment, I have quite a few cables that are just laying around. As for changes to this design, I would customize the width to make it appear less bulky.

Selfie Stick – https://www.myminifactory.com/object/selfie-stick-11330

This generation is known as the “selfie” generation, so it is imperative to invest in a selfie stick. The functionality is to take pictures to include more individuals, but the design of this can be changed in a way in which the selfie stick can rotate and extend farther than the average length.

Of course, there were a lot more awesome 3D printed items to choose from, but this is my condensed list of products that I could see myself utilize nearly everyday.

Lastly, as I stated earlier, last Monday’s class purpose was to ideate and create. I chose to add onto my existing collection of key chains. The result was this cute, miniature-sized Android keychain:

Droid