John O’Gara Semester Activity – PPT Slide and Flyer

For my semester activity I have chosen to advertise this course to more freshmen. Being the only first year student in this course was intimidating at first, but the knowledge I gained was impeccable! Now that I know of all these resources available at the university, I have a much greater appreciation for digital making.

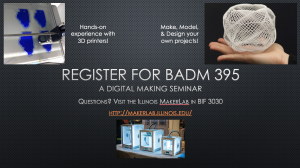
I noticed in my first semester here that professors of very large lectures will display an information slide before class so people will notice it when they are walking in. I remember seeing slides for different RSOs, business organizations, and tutoring hours, but never another course. This sparked my idea of creating a slide that could be displayed one or two weeks before Fall registration so that more freshmen would register for the seminar. This is the slide that will be displayed:

Screen Shot 2016-05-05 at 11.02.24 AM

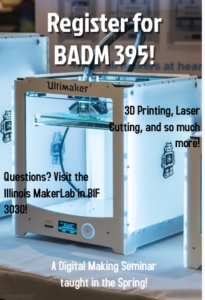
In addition to the slide being displayed, I have also made a flyer that could be posted around BIF and the engineering quad around the same time as registration. The flyer below is a draft from postermywall.com, however we could place a large order next spring to begin placing them around BIF and Wohlers. I understand that this course was promoted through College of Business emails, however it was my dad who is on UIUC Course Explorer every day, who first told me about this course. If more people knew about it and hopefully more applications be sent in, the MakerLab would continue to grow and maybe even another section of the seminar could be created! Again, the amount of resources I have gained through this course is amazing and all freshmen in the College of Business should know about the awesome things happening in BIF 3030. I am excited to see the increase in volume for next year and reach out to my former professors to see their responses!

Screen Shot 2016-05-01 at 10.43.19 PM


Last Weekly Reflection

This week Josh, Annie, and I have begun wrapping up our final project which we will be presenting tomorrow. The Tunalele actually works! After many weeks of stressing out over how difficult this would be to execute, we finally have a working product. Josh and I were still focusing on the design this week while Annie (with the help of Colton from the FabLab) took care of the Arduino coding. Our final pictures will be displayed in the presentation tomorrow but here is a sneak peak of the rastered Arduino casing: Screen Shot 2016-05-01 at 9.12.46 PM
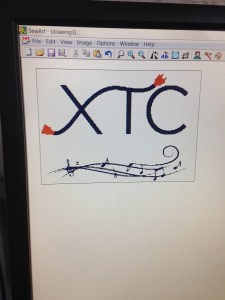
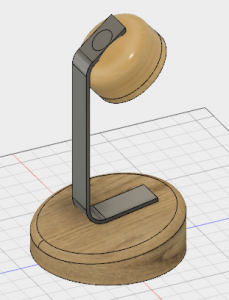
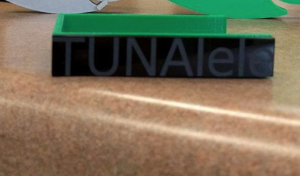
. Josh and I wanted to incorporate multiple aspects into the design to show off our skills we learned this semester, this being the reason for the rastering of the side. That, and it looks pretty cool 🙂 We also had to make a change to the fish head so that it would fit on the tuning peg without breaking it so we made some edits in Fusion and re-printed the new piece.

During the week we found a major setback in the code. It was written to only pick up electric frequencies, not acoustic, so it would work with a guitar amp but not an acoustic ukulele. Luckily, Colton and Annie found a quick fix to this by adjusting the microphone and the frequencies it would be able to pick up. We were worried for a while that we would have to find an electric ukulele to work with our tuner but they saved the day.

While this project was very difficult to complete I am so glad I had such an awesome team to work with. Annie, Josh, and Colton were amazing and we definitely could not have a finished product for tomorrow without all of their help. Can’t wait to present it to you all in class!

Indiana University Guest Speaker and More Time at FabLab!

This week we had a guest skype conversation with the professor in charge of the MakerSpace at Indiana University. Their lab was a bit different from ours in that it only contained two Ultimaker printers however it seemed like they had plenty of other resources for digital making. From what I could gather, their version of their FabLab is combined with their printers in the same MakerSpace. While it would be nice to have all resources in the same place, I realize how fortunate we are in Champaign to have a separate printing lab and FabLab that contain many different tools for us to use! Also, because I was deciding between UIUC and IU last spring, I felt even better about my decision coming here after seeing their MakerSpace! 😛

After the presentation, each group gave a two minute update on their project and how it is coming along so far. Needless to say, in that classroom I am surrounded by 20 brilliant people. We have students making things from DJ masks to heart prototypes and everything in between. I hope we have a large presentation at the end of the course in the BIF atrium to showcase our final projects so that students will sign up for the course in the spring next year! I have already convinced a few friends to take the course if time permits them too, but I definitely believe that a final showcase could attract more students.

Josh, Annie, and I left after that to go to the FabLab and talk with Colton about how to design our tuner. Josh and I found a koy fish design on Thingiverse that we are going to try to modify as the adaptor that connects on to the tuning peg of the Ukulele, and Annie will be bringing in hers tomorrow so we can take measurements. Annie also talked with Colton about the software of the design, and we actually found a good amount of public code that will help us move much further along than expected! We will definitely be back there soon to ask Colton more questions. Working in different areas of campus has been so beneficial because each time we go to a new place I have more familiarity with it when visiting the next time, encouraging me to go back and work there in future semesters.

Scanning Reflection

This week we were introduced to a new program, MeshMixer and learned how to edit scans that were taken from the iSense scanner. Our guest speaker this week was a past digital making student, Arielle Rausin, who has used the scanner in the past to create her own modified racing gloves! Seeing her talk about how she was able to create her own product for a much cheaper cost and customize it to maximize her use for it was really inspiring, especially because she was in the same place as we are, just one year ago! I had previously worked with the iSense scanner during our “Build-a-printer” event after spring break, and this was the first time I was able to play around with modifying the scans.

We began by downloading the MeshMixer program from meshmixer.com, it is available for Mac, PC, and Linux operating systems so we are able to work on imported scans pretty much anywhere. While others were learning how to use the iSense scanner, I was talking with Paige about our final project ideas since we had already learned how to use the scanner at the Ultimaker event three weeks ago. She gave me some advice on how I could find a small fish-shaped object and modify it for our “Tuna-lele” project instead of trying to draw the fish design in Cura. I would have to make sure I would not be breaking copyright laws but it could certainly save time in building a case for our arduino tuner.

After all of the scans were uploaded Arielle showed us how to import them into MeshMixer and modify them so they would print much faster and how to erase unnecessary detail. One of the biggest issues with the scanners is that they will not smooth out edges and thus create a very jagged design that could turn into a very sloppy print. She taught us how to smooth these out and also change some parts of the design to add other parts. Another important thing we learned was how to add a base to the design so that it has a stable bottom to either hold it up or prevent it from sticking to the printer. If I end up using a scanner for our project casing, I will definitely be using these tips from Arielle and create a much cleaner prototype than I had originally designed in Cura. My favorite part of her presentation was how easy-going she was and talked to us more as a friend than an advisor, it was much easier to ask her questions afterwards.

Final FabLab Rotation Reflection

This week was (unfortunately) our final class at the Champaign-Urbana Community Fab Lab, however it was also exciting because we completed our final rotation and have now worked with digital embroidery, laser cutting, and Arduino kits! The final rotation was my favorite because my group got to work with the Arduino kits and learn the basics of Arduino coding. Since our final project will be based off of an Arduino for the tuning function, Josh, Annie, and I listened very closely to the instructor so that we could begin working on the software of the “Tuna-lele.” We began the class by learning about the Arduino code writing program on the computers in the FabLab, and is also available for free download so that we may work on coding outside of the FabLab as well. Arduino Kit

The kit came with an Arduino (the black programming board in the center), a few resistors, a USB cable, an LED light, and a motor with wires to connect it to the board. Our instructor showed us the sample programs that are already written into the Arduino desktop program, one of these being the blink program used to control the LED light. Inside the code, the user is able to edit which port the command will be sent to so that they will know where to place the ends of the LED. The user can also edit the code to control how long the light will stay on or off, in this video below we created a flickering effect in the bulb by shortening the amount of time the bulb was off. arduino video

After this we learned about the touch sensor in the program and how the Arduino can actually print off numbers to show when it senses pressure through the CapacitiveTouch Library that we imported into the code. We were able to connect different surfaces to the Arduino through alligator clips and expand the surface area of the sensor. Below is the picture of the copper sheet I used to expand my Arduino’s touch sensor, and it ended up working perfectly! After playing around with a few more programs, Annie, Josh and I were able to ask questions about our project and how we can use the adaptable sensors to attach a microphone to the Arduino. There are many different parts that we would have to use and while we may not be able to have the sensor identify pitch by May, we believe that we can have the sensor identify noise and may modify our product so that it senses volume instead of pitch. I am very thankful that we got to work in the FabLab otherwise I would be very clueless around the software of most of these designs! copper touch

Build a Printer reflection!

This week was the Ultimaker Build a Printer event in the BIF atrium. While we didn’t have a lot of outside students building the printer with us I thought it was a pretty successful event because many students were stopping by the scanning station and learning more about our Digital Making Seminar! I saw a few of my friends stop by the tables to watch the prints of our sample busts in the Ultimakers, they were really interested in watching it! There were three stations at the event; the construction of the new printer, the upgrade of the Ultimaker 2, and the scanning station.

I began the event at the construction of the new printer. We had purchased a wooden kit from Ultimaker and had two teams build the frame and the central part of the printer. After helping construct part of it, I moved over to the scanning station to be a sample model for one of the bust prints. The scanner was something I had never worked with before, and I expected it to produce a very pixelated image however it was able to produce a pretty accurate scan of my head. The image was then saved as a “.obj” file and opened in Cura. In the program we shrank the scan to .1x however for some reason it still did not print by 5 PM. I think in the future we will have to decrease the quality or shrink it even more. My final group will most likely not use the scanner however now that I know how it operates it will be a great tool to use when doing future projects at U of I!

I was a little nervous about this event however now that it has passed I wish we reached out to more students that were sitting in the atrium. There were a few tables that were studying however most people there were socializing and it would have been great publicity for the course if we had a loud speaker or projector screen in the future. Next year, I will be sure to stay in contact with Vishal and suggest any ideas I could to help spread the word of the digital making seminar to other business students!

First soldering experience!

This week we had a guest professor, Mitch Altman, creator of “TV B Gone” and learned how to solder by putting together a small electronic light kit! Mitch has been staying in Allen Hall on campus this semester to teach workshops to all different kinds of students. He told us about his company, Cornfield Electronics, and how his primary product is his remote that turns off televisions around the world, “TV-B-Gone.” His inspiration for the remote was when he was in a restaurant once and no one was socializing, they were all just casually glancing at the screens to avoid conversation. He wanted to find a way to secretly turn off these TV’s and was able to do just that by copying the off code from many different remotes. The workshop he taught us on Monday was all about soldering, an activity completely foreign to me before his class!

We started off by plugging in our soldering irons, which looked almost like electric screwdrivers. Mitch warned us not to touch any of the metal because it would eventually heat up to 350° F. The solder was a small strip of metal that we would be melting into the wires of the light kit, connecting the wires to the circuit board so that electricity could flow through the entire board. Some of the pieces in the kit did not matter which direction they were placed in however as we continued on we had to pay attention to the positive and negative ends for some parts. After we had all assembled our kits, Mitch began to explain to us how we could change the series of lights through the microchip and how to edit to code for it. It actually was not very difficult as long as you knew where you were starting in the code and a small change in it could cause a completely different color to appear.

As mentioned before, I had no idea what soldering was before this workshop. What I took away from it was that solder can act almost as a metallic glue so that electricity can flow from one part to another without being disrupted. I have not worked with electronics in the arduino section of the FabLab yet but I think having this workshop prepared me well for what is to come in the next few weeks. As my group continues with our tuner for our final project we will have to add a light kit to the design to display whether the frequency is in tune or not. By learning how to solder and modify our circuit boards, we could even take our light kits that we built and just change them, however I like keeping mine on my desk for now, it’s a very cool thing to show friends. I’m learning so many new skills in this class so far and while it is moving pretty fast, I am very glad to be taking this as a freshman and learning about so many resources I can use at the university in the future.

Fab Lab Reflection Pt. 2

So, as it turns out, we are spending three days in the fab lab – not just two! I did not realize that laser cutting and arduinos were split between two groups so now we will have even more time to utilize these awesome resources! This past week, I was in the laser cutting group and got to design a personal notebook cover. I decided to incorporate one of my biggest passions into my design, music, and made the notebook cover resemble an old iPod with one of my favorite songs playing in the “screen.” I figured the title of the song was fitting, seeing as it is called “Soundtrack to My Life,” and I am going to use this notebook for a personal journal. This project really interested me in that even though all of us were laser cutting the cover of a small 3 x 5 notebook, all of them came out very differently and really emphasized the idea that making can be as personal as you want it to be.

ipod notebook

We began the class by printing other peoples’ blueprints off of the internet and now we are in the middle by creating similar physical products, but with such different detail. We will end the class by creating products that are completely different from each other, in design and in function. I have realized that this is my favorite aspect of the course, the clear progress we can track throughout the semester by learning to use different resources and incorporate them into our own projects at the end of the semester.

Also, exciting news! Josh, Annie, and I have decided to create a digital tuner for ukuleles as our final project! As more and more elementary schools switch to teaching the ukulele as opposed to the recorder, we decided to make a fun design called the Tuna-lele that is a small simple tuner in the shape of a fish that teachers could pass out to students that are behaving well in class or making great progress! Now that we have learned how to laser cut we will most likely be using that to cut into the plastic that will be surrounding the tuner so that it will look like a fish. As of now, we are not sure but I’m very excited to see where this takes us in the future!

Week 6 Fab Lab Reflection

When Professor Sachdev told us to meet at the “Fab Lab” for last week’s class, I was expecting a very high-tech building, somewhere near the heart of campus. After my phone had told me that I was still 7 min away at 1:58 I knew that this would not be the case. As surprising as the appearance of the building was, what was inside was even more spectacular. Our class split into two groups, half of the class spent the workshop learning about arduinos and the other half learned how to use the computers to print out an image that would be sewn into a piece of fabric. I was in the sewing group and was actually very impressed with how my design turned out.

We started off by choosing an image from the internet to import into SewArt. I chose the image from my acapella group’s website and decided to add some music notes below it. We had to edit the image before we could sew it because of the multiple colors the image had (I cut mine down from 7 to 3). After this we saved them to USB drives and began printing! My design was pretty accurate and actually printed very easily, the hardest part was threading the new thread through the machine when changing colors.

Computer Designafter sewing

This was my first time ever using a sewing machine and while I didn’t manually operate it I was still very happy with how it turned out! While this was only an introduction to the Fab Lab I’m very excited to work here in the next few weeks. I believe tomorrow we will switch sides and I will be able to learn more about arduinos and hopefully be able to incorporate them into my designs. Having a software element along with the hardware of something I could print would really make a more interesting project in my opinion. Really looking forward to future workshops here!!

Week 5 Reflection

We have finally gotten to the part of the course I was most nervous for, modeling our own projects in Fusion 360, and believe it or not it’s not that scary! Fusion is a huge, very powerful program with many hidden features. This week we designed a model of a desk lamp and while the design did not look too complicated, it was actually pretty challenging. The hardest challenge I faced was not being able to use the offset tool. Even the guest speakers could not find the reason for this however I realized later that I was clicking the wrong plane and was not changing the view to see which plane I was drawing the offset on. What I realized from this was that Fusion can be a confusing program for even those who are very skilled and have much experience with it. After I had figured this out I was able to produce a somewhat pleasant looking desk lamp model as shown below. Previously I had only modeled a bolt and pen cap (also shown below) however these did not require serious attention to detail as opposed to the lamp.

Now that I have done a more challenging project, I hope to continue adding to my skills in Fusion so that I can create a very interesting project. I have not settled on a particular idea for the final project yet, however I’m very interested in the light switch idea mentioned in class earlier this week so I may be teaming up with some peers and helping design that. For now, I am going to try designing key chains for my acapella group, The Xtension Chords, so that our members can have a personal unique key chain in their pockets. By next week I hope to have finalized a project idea so that I’ll have plenty of time to adapt and perfect this idea throughout the semester.

Screen Shot 2016-02-28 at 10.17.18 PM

Screen Shot 2016-02-28 at 10.17.00 PM

Desk Lamp

Desk Lamp