Week 3 Summary

This week we participated in a workshop with a professional Autodesk engineer, Lucas Ewing. Our objective was to learn as much as possible about Fusion 360, a design software created by Autodesk, which allows the user to do free-from digital manipulation. In week 2 I made a post about Fusion 360 because I decided to take at the software beforehand, but I learned much more about the different design environments that Fusion offers due to the workshop. Fusion 360 is highly advanced software. Thousands of tools and features built in to the cloud-based system allow designers to create complex, dynamic shapes. The software is used by professionals around the world, but is also a favorite among hobbyists and amateur designers. Once a design is created it can be 3D printed, so designers can create prototypes and test them within hours.

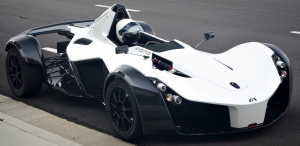
Fusion is unique because it tracks every step you make to create a design. This is useful to engineers and industrial designers who give presentations about their designs to their colleagues. It also serves as a learning tool. During our workshop we learned that there are many strategies one might administer to go about making a 3D shape. To get an idea of how detailed a Fusion 360 design could be, Lucas showed us a picture of a car that was designed almost entirely in Fusion.

Screen Shot 2016-02-21 at 11.18.56 PM

Lucas taught us how to create and manipulate shapes using the same methods he utilizes as a professional with many hours of practice using Fusion.  He helped us understand that almost any object can be recreated in Fusion.  I was fascinated by the way we were taught to design the tip of an ordinary plastic pen. Rather than just working in the triple-axis design space, we were taught to create a 2d drawing of the outline, which was essentially the upper portion of a cross-section of the pen. Once this drawing was made, we rotated the drawing 360 degrees to form the shell of the pen. We then used another tool to create the curved exterior. We then went into the “sculpt” workspace so that we could do further manipulation on the object and give it the proper dimensions.   In my opinion, the strategy we used to make the pen was highly efficient and really demonstrated the versatility of the software. Most of all, It showed the class that the skill and creativity of the designer is more important than the software itself.

We have had a lot of great presentations in BADM 395, but I think this presentation gave us the skills and motivation to become great 3D designers.  This class has inspired me to use my creativity to solve simple problems using resources like 3D printers.  When the class started I was happy to scour websites like Thingiverse.com for unique 3D designs.  Now, I feel truly independent and can design almost anything at any scale using Fusion 360.  Lucas said that it takes patience and practice to learn a new software, but I think my own curiosity will drive me to use Fusion on a weekly basis.  The realization that I now have the power to take anything from my imagination and let it take form in the physical world is really a privilege that I plan to utilize as much as possible.  I hope that this workshop inspired my classmates in similar ways and I can’t wait to see what they designed this week.

Here is a link to Lucas’s page on the Autodesk Website. Give him some likes and follows for his incredible work. https://fusion360.autodesk.com/users/lucas-ewing–2

Here is a link to 9 Fusion 360 tutorials that can help you learn much more about the software in just under an hour. http://www.autodesk.com/products/fusion-360/learn-training-tutorials

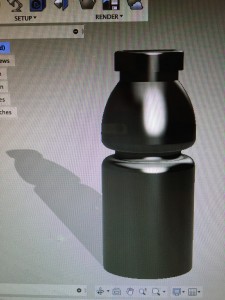
Below is an image of a Gatorade bottle I made in just a few minutes using similar a similar method to what we learned in class.

IMG_0763

Week 2, Fusion 360

Sorry this post is a little late.  Everyone has been sharing some awesome insights about 3D printing that I wouldn’t have ever thought about.

Vishal mentioned today that we will be working with Fusion 360 next week and maybe even into the following week.  After last weeks class I downloaded a trial version and began to experiment with shapes and designs and I didn’t know how long I would have to wait until we began using the program.  At first Fusion 360 seems a little daunting because the opening screen shows a very complex design of an electric drill or something with many curves and indentations.  Then when the template opens all you have in front of you is a blank space with X,Y,Z coordinates.  I just wanted to share a few tips about it in case any of you guys wanted to look ahead at the software and begin making some designs.

My goal is to tell you guys about some basic functionalities that you can utilize in Fusion to make complex shapes.  The premise of the program is that you can start with a simple object, then cut away and modify certain aspects to make complex, functional designs. For the sake of this tutorial, however, I just want to show you how to modify some shapes and I will make up the design as I go.

First you want to start simple.

Click the plane that is essentially the “floor” of the template. This will tell the program that this is the plane that you want to being designing objects on.  You will see at the top that there is a toolbar which includes options such as create, modify, assemble, etc.  Begin by clicking create.  Another menu will pop up with various shapes.  Start with a cylinder or box.  Place the center on the horizontal plane and make it as wide as you would like. Then it will give you the option to make the object taller.  Once you have your cylinder/box click on modify and go to the first option that says “fillet”, then click the top edge of your object and move the arrow around to achieve your desired shape.  I made the maximum fillet so my shape now looks like a silo.

In the top right corner their is a cube which shows various orientations, top, front, back, bottom, etc.  This is very useful when you wish to align objects next to each other.  If you have the screen at a sporadic angle, the object might not be placed on the desired plane. Use the shift key to change the orientation of your screen as well!

Now move your screen so that you are looking at the bottom of your shape.  Under the “modify” toolbar press “shell” and then click on the bottom of your object.  Now, in stead of using the arrow, we will click the box on the right side of the screen that says “inside thickness” and enter the desired width of the inside.  This is very important when making designs with various parts that go together because you need to keep track of many different measurements.

Lastly, make another shape next to your original object, except this time overlap it with the original until the object turns red.  Then, right click and press the green arrow that says “ok” on the pop-up menu.  This should have erased part of the original object and created an opening in the side.  Then, highlight the YOUR ENTIRE OBJECT and under the create menu, press “pattern>circular pattern”.  On the right hand menu press “axis” and then click on the origin and then change the quantity to however many you would like and then press “ok”.

Screen Shot 2016-02-08 at 8.07.57 PM

Congratulations, you have now created and igloo village.

Week 1 Reflection

Already I can tell that this class will succeed my expectations when it comes to learning and gaining experience with a useful, intuitive technology.  Like most of you, I had a small amount of familiarity with 3D printing before class, but after hearing John’s presentation I realized how little we know about how far the technology can take us.  If 3D printing can captivate the attention of someone as smart as John Hornick, then we should really use this class to our advantage to utilize every resource available to us in the lab.  From what I gathered about the class so far is that we all come from diverse backgrounds and have a variety of talents and interests.  The beauty of 3D printing is that it does not matter who you are, or what resources are available to you – if you have an idea, you can create it. Therefore, as a class we have the potential to generate items and ideas through the mentorship of Vishal and the inspiration of others.

I first learned about 3D printing from a youtube video.  It was about five years ago, if I had to guess.  The additive manufacturing technique I saw in the video was like nothing I had ever seen in my life.  Luckily, I was able to take an autoCAD class my senior year of high school that would introduce me to the technology again.  At my high school we only had one 3D printer and people could only print out small shapes they designed using minimal autoCAD experience and motivation.  Five years later, the performance and engineering of the technology has vastly improved and we will, as rumored, will have access to advanced 3D design technology on the computer.  I come from a background in art and design, so I think the creation process and sheer joy of making will come naturally to me.

I am excited to take this course because I know that most of the learning will be done mostly through interaction with my classmates and hands-on learning.  From each other we can not only come across new objects and ideas, but also open our minds to thinking about the future.  Maybe few of us will actually hold jobs in the 3D printing industry, or have any kind of association, but unless we familiarize ourself with new technology then as businesspeople, our careers could be jeopardized long-term. Hopefully working with this technology will inspire us to restructure about how we think about technology and motivate us to stay ahead of the curve.