Week 5: Autodesk Fusion

Time for a new software! In the past few weeks, we’ve been going through a new software (well, new to us) that can be used in designing 3D items – Fusion 360!

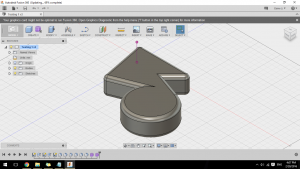
We started out learning all the basic functions of F360, how to ultilize the commands and all that jazz. Since we were essentially freeforming, here’s a pic of the slightly off shape I ended the lesson with:

Week 5 Reflect

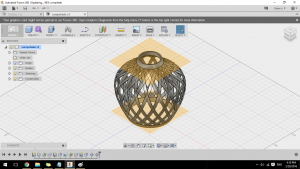
After that for our weekly assignment we had to follow one of the tutorials posted on the Autodesk website and create something from there. Honestly, it wasn’t as easy as I imagined it to be. After all, we’re following something step by step! There were a couple of times when I ended up in the wrong environment and couldn’t find a specific tool that I needed, and other times when I just clicked on random buttons and couldn’t go back, so I guess this practice was a great one to familiarize ourselves with the program.

Anyway! I created a lampshade from the tutorial, which was awesome fun.

Week 5 Reflect

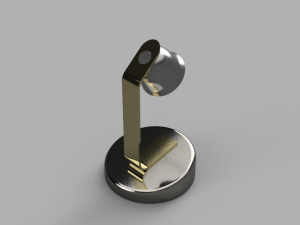
During class on Monday, we were supposed to design a desk lamp (which mine ended up turning wonky at the very last few steps to connect the lampshade and the arm). One of the really cool things about Fusion 360 is that we get to pick what materials we would like our lamp to be rendered into, and I ended up picking platinum for the base, gold for the arm and silver for the lampshade, which was utterly unfeasible, but still really cool. Look at how shiny that is!

Desk_Lamp_InClass_2016-Feb-22_09-56-37PM-000_HOME

Now that I know a bit of the basics, I can’t wait to create more stuff and print them!

Week 3: DFA Workshop!

This week we had a workshop with Design of America (DFA), University of Illinois chapter. The 4 speakers, Ryan, Michelle, Chandra, Mia, come from a very diverse background, with majors ranging from Media to Engineering. They gave us an overview into DFA, as well as the basics of design before we dived into the first activity – using out bodies to create letters in pairs! After that we were given 4 cases to pick and choose, and try to solve the problem with designs. The class split into teams of four in order to come up with a solution for one of the visually impaired individuals.They provided us with air clay and cardboard to create our prototypes, and we set to work. Each case involved individuals suffering from visual impairment.

The DFA gave us a very interesting perspective of design. Previously, I’ve always assumed that design is a very aesthetic thing. However, after this workshop i’ve learnt that design is a process for navigating challenges to uncover where you can make a difference in people’s lives. My idea of designing something is having an idea of what one wants to make and design as one is sketching. However, the DFA process is Emphatize – Define – Ideate – Prototype -Test, which is a much more streamlined process that what I expected.

This workshop has taught me to think from various perspectives, and think in creative ways to solve issues and problems. This is also a great insight into the work that DFA has done so far, and I look forward to be able to work on future designs that can solve problems.

Week 2: First time printing!

This week we had the chance to explore various websites for 3D printing and finally print our very first item!

The website my group got was Thingiverse, which is awesome for newbies since it was in ready in print files. We looked at Hyperbolic Planetary Gearset, which is “a visually exciting object which is a practical demonstration of both simple and advanced principles in the design of geared systems.” or basically, a plaything.

This is a really cool design though, consisting of 7 printed parts that had to be put together with screws. The remixed version (where people upgraded the original files) doesn’t require screws which is great.

When it came to our turn to print items, I picked a relatively small one (it printed in less than 20 mins), Cable Holder (Cable Clip), which I resized to 75%, following one of the comments that mentioned that this was too big for iPhone cables. It still turns out a little too big though, so most likely 65-70% would have been the right size.

Since I took videos of the printing with Snapchat i lost the files (forgot to save them!!!), but still!

Dale Dougherty said in “The Maker Mindset”: “While technology has been the spark of the Maker Movement, it has also become a social movement that includes all kinds of making and all kinds of makers, connecting to the past as well as changing how we look at the future.” This is especially true in the Thingiverse website, where all sorts of items can be found. That said, here are 4 functional items form Thingiverse that I would definitely print sometime in the future.

Customizable Cable Holder

Since I have so many cables running around my room, I figured this would come in handy. I would probably customize this to the thickness of my table (since it’s a glass piece and not a thick slice of wood), and my dresser.

Mini Tape Gun – Tape Dispenser

This looks awesome! I would most likely enlarge this until it’s the size of masking tapes though, since i always have trouble tearing strips of it when I am shifting houses.

Paste Pusher Animals

These are always handy, since everyone brushes their teeth (or I’m sure most do). No more squeezing the paste up for it to slide down again!

UBO – The Universal Bottle Opener

Trouble opening bottles? No worries, here’s the universal bottle opener! I’ve always relied on my apartment mates to open jam jars for me, so this would be a welcome addition!

Week 1: Endless Possibilities

With machines purring all around me as I sat in class, eagerly awaiting the start of the very first Digital Making class, I can’t help but ogle at the finish products on every surface in the classroom. Unlike most classes that I attend at the U of I, this must be one of the most hands-on and interesting class to date. With 3D making, the possibilities are endless. Anything that you can design and create can be made in your own home (or in this class, the Makerlab). That excites me to no end, knowing that by the end of the semester, I would have the skills and knowledge to do exactly that.

This week, we had a guest speaker, John Hornick, the author of the book “3D Printing Will Rock the World”. John ran us through the basics of 3D printing, including some of its more interesting uses in the healthcare industry as well as the pros and cons of 3D printing made available to consumers.

The few basic types of 3D printing he mentioned included:

  • Directed energy deposition
  • Material extrusion
  • Material Jetting
  • Powder Bed Fusion
  • Sheet Lamination
  • Vat photopolymerization

From John’s lecture, I’ve learnt that 3D printing is a preferred method of prototyping product for startups, due to its high cost benefit ratio, since 3D printing is extremely cost effective, and takes a lot less time to create a product as compared to commercial alternatives. This has led to a huge impact on the manufacturers, since consumers now have the ability to create products instead of having to buy them.

John’s lecture has inspired me to look through the internet for cool and interesting uses of 3D printing, and by chance, I stumbled upon this video.

Novel 4D printing method blossoms from botanical inspiration by Wyss Institute for Biologically Inspired Engineering at Harvard University and the Harvard John A. Paulson School of Engineering and Applied Sciences

A short excerpt from the article:

“A team of scientists at the Wyss Institute for Biologically Inspired Engineering at Harvard University and the Harvard John A. Paulson School of Engineering and Applied Sciences has evolved their microscale 3D printing technology to the fourth dimension, time. Inspired by natural structures like plants, which respond and change their form over time according to environmental stimuli, the team has unveiled 4D-printed hydrogel composite structures that change shape upon immersion in water.”

Do check out the video if you have time!