
I researched tutorials for how to print a 3D heart model from a CT or MRI scan. There are currently no tutorials for printing 3D hearts that takes you all the way from the DICOM files to the printer. This was quite a challenge and I still have a lot more work to do. This tutorial is only for an external 3D model of the heart. I have not found an easy way to create an accurate 3D model of the internal chambers/structures of the heart. I will continue to research this throughout the semester and repost when I discover a succinct way to accomplish this (any advice is greatly appreciated).
I delved into three different techniques which each utilized a different software. First, I investigated 3D slicer, which is an open sourced NIH sponsored 3D imaging software. Slicer is the equivalent of R in the statistics world, which means there is infinite potential, but it is also not very user friendly. Slicer has plugins that you can download which sound like they outline and make automatic traces of certain body parts. This would be the perfect platform for what I would like to accomplish. Osirix also has plugins you can download, but development would be much slower since it is not open source. Osirix is also only for Mac, this is a huge limitation of the tutorial. I will eventually discover a nice way to create a model with a PC as well.
The second way in which I know people are creating 3D models of the heart is by using Mimics, which is a privately owned software by Materialise ($$$). In this software, you make things similar to the ROIs that we will make in Osirix called masks. I do not have access to this software so I was not able to play around with it.
The most widely used software and arguably the most well known to practicing Radiologists is OsiriX. OsiriX has a free version available to the public which you can download here: http://www.osirix-viewer.com/Downloads.html This is the software we will use for my tutorial, again Macs only.
Now without further ado, here is a tutorial of how to convert a CT or MRI scan into a .stl file which can be printed. In my final project, I will look into how to clean up the .stl file in Meshworks to make it amenable to the printing process. I also hope to find a succinct way to accurately print the internal structures of the heart.
Software you will need before you get started ( free versions):
1. OsiriX imaging software 3D slice
First, you need to download some free anonymous medical DICOM images here:
http://www.osirix-viewer.com/datasets/
- Open OsiriX. A box will pop up if you are using the free version, click agree that you understand this version is not intended for clinical use.
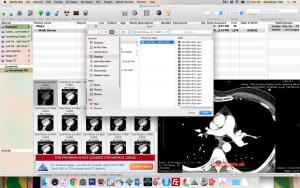
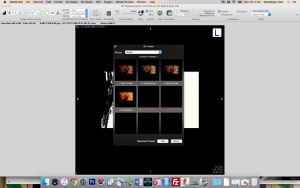
- Click the import button on the top left corner of the tool bar. Select the study you would like to import from your file. (CT/MRI scans consist of multiple images and you want to import all the images of the study (i.e. The entire folder). IMAGE 2
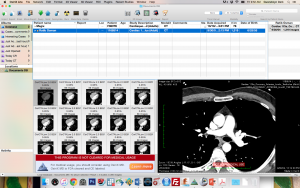
- Click on the study name that appears after you import it. A series of images may pop up down below. Double click on one of the series to open the series in the 2D viewer. IMAGE 3
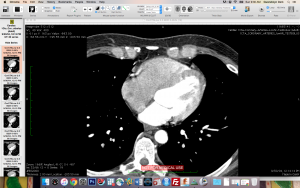
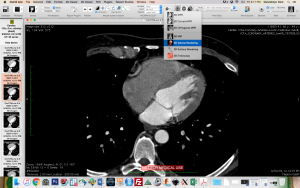
- The image you see should open to the transverse view by default. You can change the orientation in the top tool bar, but for now stay in transverse view. (the far left brain slice button on the top tool bar)
- With your mouse in the 2D viewer you can now scroll through the images to see how they progress throughout the body in the transverse view. Try scrolling through untill you can see the “four chamber” view of the heart. IMAGE 4
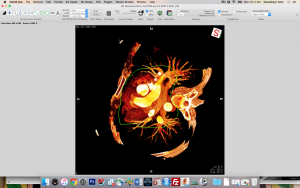
- Then click the 2D/3D wheel cog at the top and select 3D volume rendering. IMAGE 9
- I found the image easier to visual under the “No Shading” 3D presets which can be found under the “calendar-like” icon at the top bar IMAGE 10
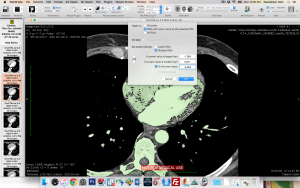
- Now you can view and rotate your 3D image to get a sense for your region of interest. The cube function at the top is my favorite to navigate around the model; it is similar to the autodesk/fusion 360 navigation. Now we will crop the image to get just our ROI. As you do this, keep 3D printing in mind so you can minimize the amount of supports the printer will use. For example, you want to crop the descending aorta so that it is in line with the inferior aspect or base of the heart. You can see in the picture I cropped all bones, surrounding body wall, and unnecessary pulmonary vasculature/collaterals. IMAGE 11
- Now exit out of 3D rendering and go back to your 2D image slices. From here select the different views at the top and notice how the cropping has taken out all the unwanted segments.
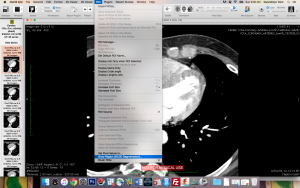
- Go to ROI in the dropdown menu and select “Grow Region 2D/3D segmentation” IMAGE 5
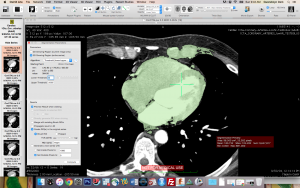
- Now you need to select the ROI (region of interest) and choose a threshold. In the pop up box, select the following: 3D growing region, set lower threshold to 0, set upper threshold to 2000, select preview result when clicking, create ROI(s) in the original series, Brush ROI, set outside pixels to 0, and choose a name for the ROI (in this example I named it “Heart”). Now click on the heart and it should become highlighted. Then click compute. IMAGE 6
- Now close the segmentation parameters. Go back to the ROI dropdown menu and select “Set pixel values to…” Now select ROIs with the same name as the selected ROI and Inside ROIs. The values should read: if current value is larger than -1024, if current value is smaller than 3071, and to this new value 3024 (white color). Then click okay. IMAGE 7

- Again go back to the ROI dropdown menu and select “set pixel values to…” This time select ROIs with the same name as the selected ROI and OUTSIDE ROIs. The values should read: if current value is larger than -1024, if current value is smaller than 3071, and to this new value -3024 (black color).
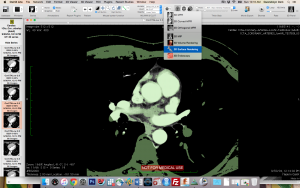
- Now again click the 2D/3D wheel cog at the top and select 3D surface rendering. IMAGE 12
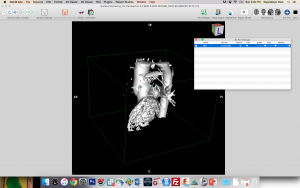
- This was by far the most frustrating part of the project. I finally realized that you have to go up to the ROI Manager at the top and click on your ROI to get it to show up. IMAGE 13
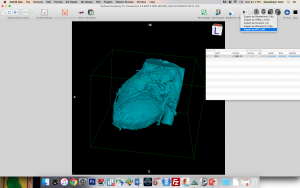
- Now you will export your file as a .stl file. Go up to the wheel cog at the top which says Export 3D-SR, a
nd select “Export as STL (.stl)” IMAGE 14
Once you have your .stl file you can clean it up in Meshworks. I will continue to work on this tutorial. I appreciate any and all feedback you have for me. I also welcome questions! Thank you!
Thanks Paige!
Gwen, your passion for health and the medical field is inspiring. I am fascinated with your take on how you, yourself, can put the Maker Movement to good use and create breakthroughs in your field. I’m very excited to see your 3D printed heart when you are finished!