
Sorry this post is a little late. Everyone has been sharing some awesome insights about 3D printing that I wouldn’t have ever thought about.
Vishal mentioned today that we will be working with Fusion 360 next week and maybe even into the following week. After last weeks class I downloaded a trial version and began to experiment with shapes and designs and I didn’t know how long I would have to wait until we began using the program. At first Fusion 360 seems a little daunting because the opening screen shows a very complex design of an electric drill or something with many curves and indentations. Then when the template opens all you have in front of you is a blank space with X,Y,Z coordinates. I just wanted to share a few tips about it in case any of you guys wanted to look ahead at the software and begin making some designs.
My goal is to tell you guys about some basic functionalities that you can utilize in Fusion to make complex shapes. The premise of the program is that you can start with a simple object, then cut away and modify certain aspects to make complex, functional designs. For the sake of this tutorial, however, I just want to show you how to modify some shapes and I will make up the design as I go.
First you want to start simple.
Click the plane that is essentially the “floor” of the template. This will tell the program that this is the plane that you want to being designing objects on. You will see at the top that there is a toolbar which includes options such as create, modify, assemble, etc. Begin by clicking create. Another menu will pop up with various shapes. Start with a cylinder or box. Place the center on the horizontal plane and make it as wide as you would like. Then it will give you the option to make the object taller. Once you have your cylinder/box click on modify and go to the first option that says “fillet”, then click the top edge of your object and move the arrow around to achieve your desired shape. I made the maximum fillet so my shape now looks like a silo.
In the top right corner their is a cube which shows various orientations, top, front, back, bottom, etc. This is very useful when you wish to align objects next to each other. If you have the screen at a sporadic angle, the object might not be placed on the desired plane. Use the shift key to change the orientation of your screen as well!
Now move your screen so that you are looking at the bottom of your shape. Under the “modify” toolbar press “shell” and then click on the bottom of your object. Now, in stead of using the arrow, we will click the box on the right side of the screen that says “inside thickness” and enter the desired width of the inside. This is very important when making designs with various parts that go together because you need to keep track of many different measurements.
Lastly, make another shape next to your original object, except this time overlap it with the original until the object turns red. Then, right click and press the green arrow that says “ok” on the pop-up menu. This should have erased part of the original object and created an opening in the side. Then, highlight the YOUR ENTIRE OBJECT and under the create menu, press “pattern>circular pattern”. On the right hand menu press “axis” and then click on the origin and then change the quantity to however many you would like and then press “ok”.
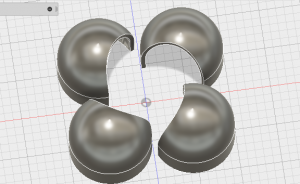
Congratulations, you have now created and igloo village.