Accessibility in the Course Design
There are three steps to teaching online courses: plan, development, and run. Adopting accessible materials makes the process easier for you and your students.
According to Section 508 of the Rehabilitation Act, accessibility should apply to all of the following course content materials:
-
- Videos
- Word Docs
- PDFs
- PowerPoint Files
- Assignments
- Course content pages
- Anything posted in course
The most common file types shared with our students are PDFs and Microsoft Office files. Many of you have used and shared PDF files for readings in your course. PDFs are developed mainly for printability and generally easy to create and edit. However, it has become less popular for digital materials because it is not easy to adapt to smaller screens and different resolutions and can take substantial remediation efforts to make accessible. Microsoft provides better accessibility support for its Office product than Acrobat for PDF, but making MS Office files accessible still requires significant time and effort. HTML or ePub has become the most popular alternative for digital course materials with better accessibility support. They are specifically developed for digital publishing using the same technologies building the web with industry standards to ensure equal reading experiences for all. They are compatible with Assistive Technology (AT) like screen readers and text-to-speech/read-aloud tools. In addition, it provides a better mobile experience. They are easy to use on any size screen and provide flexible size and format options. eLearning staff will work with you to create accessible files and replace inaccessible PDFs.
Plan
You will be provided with an accessible syllabus template that has been specially prepared for meeting the accessibility and campus/college/department requirements for a syllabus. If you prefer to work on your own document syllabus, you can pass it to eLearning for format checking. We will integrate that content into the template. If you have old readings and course files and are not sure whether they are accessible or not, check with the eLearning Office so that we can help to check the format of the files and to convert them into accessible formats as early as possible if needed.
Development
During the development stage, all course materials are determined with accessibility in mind: lecture videos, assignment instructions, readings, and quizzes and exams.
It is legally required to provide alternative text for visual objects for those who cannot see them. For example, if you are explaining a graphic on the board in a video or live sessions, your class transcript will have to include details on that graphic. , or if you are drawing, details on what you are doing so that a visually impaired person clearly understands the graphic or your drawing without seeing it. Text descriptions can benefit everybody including auditory learners, people with autism, or those for whom English is not their native language. As the instructor of the course, you are responsible for quality text descriptions for any important visual objects used in your lecture videos such as photos, graphs, and charts. Descriptions should clearly deliver the intent, purpose, and meaning of the visual object. eLearning Office can provide you and your content TAs with training in which you can learn more about visual description principles, or you can follow the sample descriptions from the Visual Description Training created by the eLearning Office.
For lecture videos, the eLearning Media team will guide you through the pre-recording, recording, and post-recording processes to make sure that all the videos are created with accessible features. During the pre-recording stage, you will be asked to provide source information of images for appropriate citation and copyright statement if they are not owned by you. During the recording stage, you are required to speak as clearly as possible and describe any images, charts, or anything someone would need to “see” in your videos in detail. When you are showing a video or demonstrating to run an application, you need to describe the process in detail as well. During the post-recording process, you are required to provide a text description for the visuals you may not cover during the recording. Although you try to elaborate the visuals during the recording, sometimes you may forget some points or your elaboration is not simply sufficient to deliver the visual content to the learners. The eLearning staff will help you identify those visuals requiring further description and review the format and content of the description for accessibility.
Assignment instructions are built-in accessible Word, PDF or PPT. Some courses handling data use Excel. All of these files need to go through accessibility checks by the eLearning Office. Any complex images used in these files also need a text description from you.
For readings from a textbook, check with the book store and/or publisher for a digital version. If there is a digital version, check with the publisher for accessibility compliance (i.e., Document Accessible Profile). PDF articles and readings need to go through the accessibility checks by the eLearning Office. If any PDF articles linked from the library are required, their link will be tested by the eLearning staff. If any non-accessible PDF readings are copyright protected, the eLearning Office will create an accessible version to share with the students with disabilities only.
Math expressions used in Quizzes and Exams will be format-checked and tested by a screen reader by the eLearning Office. You will be asked to provide a text description for images used in the quizzes and exams.
The course sites (Blackboard and Coursera) need to be tested with a keyboard and screen readers by the eLearning Office. Most of the course materials, especially the lecture videos, are transformed into HTML documents, which then become ePubs that allow users to better interact with the materials provided in the courses.
Run
When the course is ready for students, this is the last step. You will be expected to interact with students during live sessions. For your live sessions, eLearning Office will provide you with an accessible presentation slide template. If you are using any important visuals like photos and graphs, you need to provide text description either in the note section of the file or in a separate Word document. For format checks, the instructors are required to send a weekly slide file to the eLearning Office 48 hours prior to their first live session. This will allow the eLearning staff to check the format and provide any needed support for accessibility. You will receive the format-checked version before your first session to confirm any changes made to the slide file.
During the live sessions, the instructors are suggested to use integrated verbal descriptions, which allow students to better understand the content of the session. This can be applied for recording a lecture as well. When you are running a live session, approach as if you are creating a session for radio. Any important visuals shown on screen need to be appropriately elaborated. If you are using a whiteboard to write a formula or draw a diagram in particular, try to explain what you are doing on the board verbally. To do that, it is recommended to plan key ideas ahead of the sessions. This will result in a natural integration of the description and everyone gets the same information at the same time. It will eliminate any post-session transcription of the visuals.
If you have any students with the DRES accommodation letter for hearing impairments, DRES offers live caption service via zoom for live sessions. If you use a whiteboard or draw something during the live sessions, you may be requested to save the annotated version of your PPT slide and provide an additional description with more details after the live sessions.
For the integrated visual description, you can use the same basic principles for describing an image:
-
- Include what is displayed in the image.
- Give examples when needed to help students better understand what is being displayed.
Avoid ambiguous language such as “this,” “that,” “here,” “there,” or gesturing to objects without clarification.
Example 1
-
- Bad example: “What you see here is data that’s been collected for the city of New York for many, many years.”
- Good example: “What you see in column C is data that’s been collected for the city of New York for many, many years.”
Example 2
-
- Bad example: “So if I take this, it only has one argument. It says, what is the probability you’re looking for? Well, the probability I’m looking for is sitting right here. So, I click on it, and I say return.”
- Good example: “So if I take the function NORM.S.INV, it only has one argument. It says, what is the probability you’re looking for? Well, the probability I’m looking for is 0.898948. So, I click on it, and I say return.”
Example 3
-
- Bad example: “So what I need to find out is first of all what is the sum of all the occurrences? The sum of all occurrences is just sum of the column right here.”
- Good example: “So what I need to find out is first of all what is the sum of all the occurrences? The sum of all occurrences is just sum of column B.”
Accessibility Check During Course Development
| Stage | Item | Action | Resources |
| Plan | Syllabus | Create an accessible syllabus (table & headings). | Template |
| Old Files | Share with eLearning for format check. | ||
| Development | Video Lecture | 1. Share the image source info with eLearning for copyright check.
2. Create a text description for visuals. |
Visual Description Training |
| Assignment | 1. Share files (Word, Excel, PPT, & PDF) for format check.
2. Create a text description for images. 3. Check software or apps for accessibility compliance. |
||
| Reading | 1. Share files (Word, PDF, or website) for format check.
2. Create a text description for images. 3. Check the download link. 4. Check with the publisher for a digital version. |
||
| Quiz & Exam | 1. Share files (Word, Excel, or PDF) for format check.
2. Create a text description for images. 3. Check the time settings for any extension requests. |
||
| Run | Live Session PPT | 1. Create an accessible PPT slide and send it 48 hours prior to the live session.
2. Create a text description for visuals. 3. Provide an annotated version of the PPT slide after the live session if requested. 4. Create text description for visuals and transcript for handwriting if requested. |
eLearning PPT Template |
| Live session Run | 1. Provide an integrated visual description.
2. Create a text description for visuals and transcription for handwriting. |
Expanded Focus on Accessible Courses
eLearning office has been working to improve all students’ inclusive learning experience on campus and also globally offered Massive Open Online Courses (MOOC). eLearning’s work in MOOC accessibility has been the focus of articles, podcasts, and conference presentations.
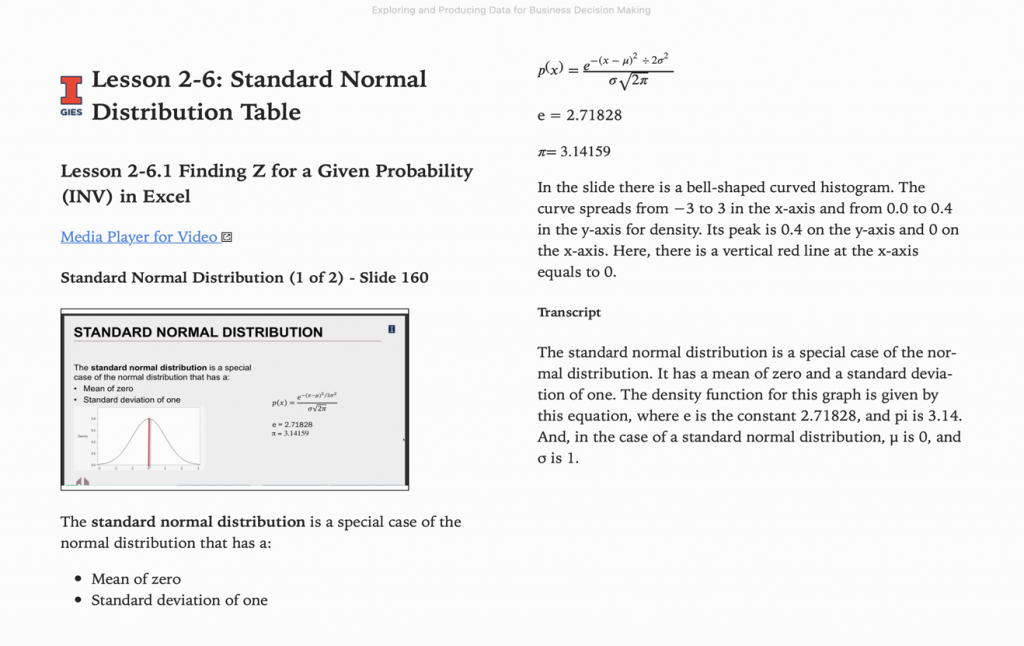
Extended Video Lecture Transcript
The accessible format of your lecture allows for the creation of a universally designed electronic publication (ePub) that complements the content in your MOOC. Beyond the closed captioning in videos, eLearning Office has incorporated the link to videos, advanced text description for images and complex graphics, machine-readable math equations, and full transcripts of videos into one single file format which can be downloaded and used with any standards-based e-reading software supporting the ePUB 3.0 format. We believe the Gies ePubs will have bigger impacts on general online learners beyond accessibility. To make sure Gies is doing the best job possible, eLearning Office engages with outside design and auditing services. This lets us know we are on the right path.
The list of the items in the extended transcript includes a TOC, link to videos, scenes from the video as slide images, recreated texts presented in the slide, textual description below the image for any important visuals presented, and transcript. All the tables are recreated and if there are any math expressions, MathML is used to recreate them. If there are any external files used, links are provided to download them. Those external files like readings should be accessibility checked. All of these were created in HTML format and converted into ePub.
You can see the general layout of a lesson.
Creating an extended transcript requires team efforts. The general process to create an extended transcript involves these steps.
- Text/Image Extraction: Extract text from presentations and screen capture scenes from videos. Provide descriptions for images.
- Copy Editing: Review video transcripts for clarity and grammatical accuracy and edit supplemental materials to match APA format (i.e., citation and copyright check).
- HTML Creation: Markup headings, tables, lists, etc. with HTML.
- HTML Review: Inspect the HTML against a review checklist for accessibility and quality control.
- ePub Conversion: Convert HTML into ePub and PDF for distribution.
If you have any questions or suggestions on this topic, please contact Jinhee Choo (eLearning@business.illinois.edu).