UGL 101: Printing from a laptop

*UPDATED 10/31/2018*

Fellow UGL’ers, we hope that these past three weeks have been great. Hopefully, you noticed the new changes at the UGL. Did you know that, not only can you print from our computers, but you can print from your very own laptop? Now you won’t have to move seats. For your convenience, here is a UGL 101 on laptop printing. First things first, make sure you are connected to IllinoisNet. You must be logged in from this network in order to print from your laptop.

Connect to IllinoisNet from your laptop image

Connect to IllinoisNet from your laptop

After you’re connected, go to this site to continue: http://go.library.illinois.edu/webprinting

It should take you to the PaperCut system that the library uses for printing.


Log in with your Netid and Password. Once you’re logged in, on the left hand side, there should be a couple of options. Click on “Web Print.”

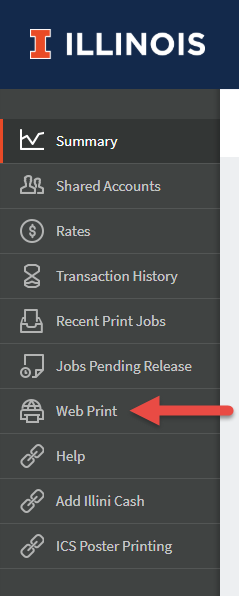
After you click on “Web print”, on the right-hand side, click on “Submit a job.” This will let you select the printer and also upload your document.

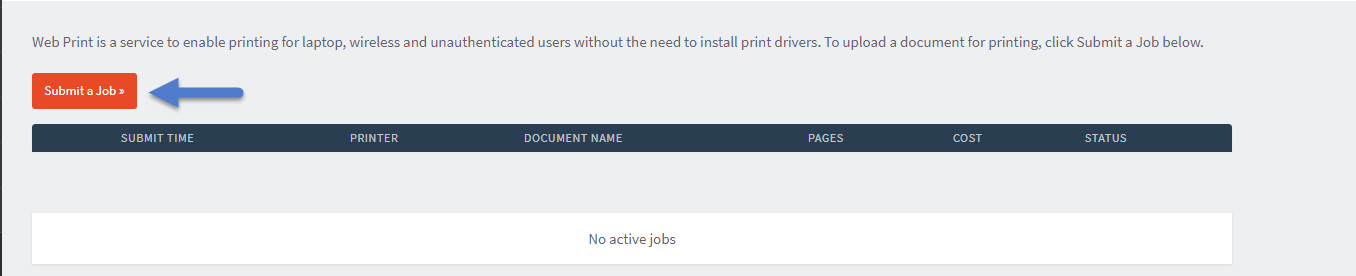
Once you have clicked on “Submit a job”, it will take you to a page where you can select which printer you would like to use. The UGL has black and white printing (10 cents per page) and color printing (40 cents per page).

When you select the printer you would like to use, the next step will be to select how many copies you would like to print out.

Have you chosen how many copies you would like to print out? Great, to continue, you will now upload your document. Remember that it can take a couple of seconds for your document to load.

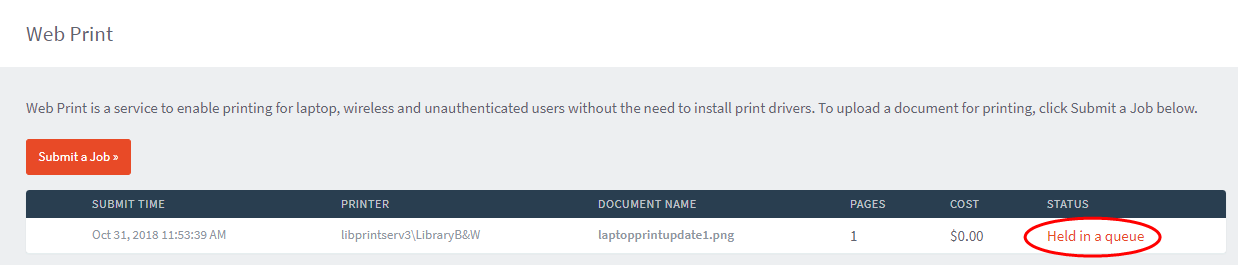
Once you have uploaded your document and submitted the print job, a page will appear. It will show you the document you have uploaded along with what printer it will come from. The status of the print job will also be shown. The status will say “Held in a Queue”. This means that the document is ready to be printed.

To complete this print job, locate a printing station at the UGL. Once you are at the station, log in with your net id and password. Once you log in, your print job should appear. Press “Print”. Your student account will be charged and voila! You are done. So, there you have it folks. As usual, if you need any assistance, let us know and we’ll be happy to help you.

Twitter Linkedin Digg Delicious Email Tumblr Reddit

UGL 101: Printing from a Laptop

*UPDATED: 10/31/2018*

As you find yourself immersed in your studies at the UGL, you realize that you have to print out something. Wait, does this mean that you have to actually find an open public computer to print your things out? No! You can print out your work from the convenience of your own laptop. Follow these easy steps and you’ll be on your way to becoming a printing wizard!

UGL 101: an introduction

UGL 101

The first step is saving your file on your hard drive. Protip: make sure that the name of a file is something you can easily recognize without having to scroll down a list of documents. Remember, if your document is anything other than Microsoft Word, Excel, Powerpoint, or PDF, you will need to convert it to a PDF before you send it to the printer.

The next step is logging into IllinoisNet. This is the only wireless network that will work for laptop printing. Once you’ve connected to IllinoisNet, go to this website: http://go.library.illinois.edu/webprinting

This page should appear and ask you for your NetID and password.

Once you have logged in, click on the “Web Print” tab on the left side of the window.

Click “Submit a Job”

Once you are on this page, you can search for “library” to find library printers. You have the choice of selecting which printer you would like to print from – black & white or color. Black and white printing is 10 cents per page and color printing is 40 cents per page.

Once you have selected your printer, proceed to step 2, which is to select the number of copies you would like to print of the selected document. Selecting “Charge to my personal account” will make the charge payable from your student account. Next, you will want to select “Upload Documents.”

The third step will be to upload your document. Drag your file into the box or click on “Upload from computer” and select the file you want to print from wherever you saved it on your computer. Then click “Upload and Complete.”

Once you have uploaded your document, it may take a couple of seconds for it to fully upload, so be patient! When the status is “Held in Queue”, that’s when you are able to go to a printing station and print out your document. If you have questions regarding the printing stations, see our helpful guide to printing at the UGL.

See? Easy as pie! It’s one less thing to worry about, and you can go back to sipping on your pumpkin spiced latte (or energy drink, if that’s your poison).

Twitter Linkedin Digg Delicious Email Tumblr Reddit