On the third installment of our Media Workflow Series, We’ll review what you’ll need to know to carry out your shoot. We describe different steps you should take below:
Framing your Shot:
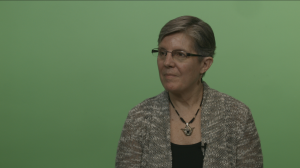
A common guideline for framing a shot is the rule of thirds, in which you divide the frame vertically and horizontally into thirds with an imaginary grid. This helps to utilize the space of the frame and make the video more visually appealing. The following photos demonstrate the rule of thirds:


Lighting your shot:
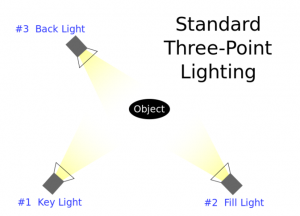
It is also common to use a three-point lighting system. This consists of a key light, fill light, and backlight. You can always add or subtract lights from your setup depending on the aesthetic you are hoping to achieve.
- The key light is the brightest light in the setup and shines directly on the subject.
- The fill light is a softer light that is placed at an angle on the opposite side of the key light. Its purpose is to reduce shadows.
- The back light separates the subject from the background. It is placed behind the subject.

The Media Commons video studio provides a lighting system that can be manipulated to create the desired aesthetic.
Synchronizing Cameras
Shooting with multiple cameras requires synchronization during post-production, because you will likely not start recording on each camera at the exact same moment. The Media Commons video studio contains two cameras that record directly into the computer, which makes it possible to synchronize the footage by timecode. Otherwise, the footage can be synchronized by audio, utilizing programs such as Pluraleyes if necessary.
Monitoring Audio
It is important to check the audio levels before shooting and continue to monitor them while recording. A suitable audio level is somewhere between -6 and -12dB. The audio meters should appear green or close to yellow. If the levels go above that or the color on the meter turns red, you’ll need to adjust the audio.
Battery and Storage Media Limitations
You should monitor the remaining battery power and memory storage during your shoot. Depending on the length of the shoot, you may need to change out batteries for the camera or audio equipment. In that case, it is important to have charged spare batteries so you don’t lose any shooting time.
It is also important to keep track of any limitations with storage media. Depending on the camera you choose, you will do this with the SD card or the camera’s internal memory. Try to figure out how long you plan to shoot and if the memory is capable of storing that much at once. In some situations, you may have to offload footage or swap out SD cards if you plan on recording a lot. Additionally, some cameras are only capable of recording a certain amount of consecutive footage (such as 15 or 20 minutes at a time), which would just require stopping and starting the recording.
When is it appropriate to stop a take midway and restart?
Some instances where it is appropriate to stop a take and restart recording include noticing audio feedback or environmental noise, or perhaps if the subject of the video needs to repeat something they said. The same also goes for situations where you can only shoot for a certain amount of time consistently (such as 15-20 minutes at a time) and need to start and stop the recording for a moment.

