Hello Class!
As the semester wraps up, I have completed a research paper focusing on the impact that 3D printing can have in my area of Graduate Study: Recreation, Sport, & Tourism. More specifically I focused on the way 3D printing is being used by sport equipment / good manufacturing companies such as Nike, Under Armour, etc… Additionally I analyzed the current capabilities of individual users ability to 3D print sport products. In the long term, increased domestic printing from consumers themselves will significantly impact sports industry stake holders such as retail stores and sports manufacturers. The “maker movement” and increased use of 3D printing, will change the relationship between consumer and the top sport equipment brands.
3D Printing: A Game Changer for Sporting Good Industry
Carter Carroll
University of Illinois

“ 3D printings effect on industry will be profound… it will blur the lines between manufacturer and customer… Markets dominated by a few huge players will be transformed as existing companies, start ups, former customers, and end users start making selling, and using products and services that never existed before”( Hornick, 2015). The above statement highlights how the increased use of 3D printing technology will likely continue to be a major economic disruptor across industries, as well as society with the “Maker Movement”. The sporting goods industry is one market in particular that has already started capitalizing on the technology to create innovative products. Participation and enjoyment of sport and recreation activities, permeates everyday life in the United States as well as globally. While most of the professional sports industry revolves around selling intangible products such as event experience or branding of teams and sponsors, the use of 3D printing technology certainly looks to have a major impact on the sports and recreation industry particularly with the manufacturing of sporting goods such as equipment. This paper analyzes the impact of 3D printing in the sports industry through exploring why the technology is valuable to various stakeholders, examples of current uses of 3D printing within the sports industry, and possible future implications the technology will have on the industry. Ultimately it is apparent that 3D printing technology will have a beneficial impact for multiple sport and recreation stakeholders, and its growth in the industry will revolutionize the way sports gear is made.
Value of 3D printing Technology on Sport Industry Stakeholders

Firstly, it is important to recognize how and why the use of 3D printing technology is valuable to stakeholders in the sports industry. The capabilities of 3D printers will transform traditional manufacturing across all industries primarily because they lower costs, are more efficient, create fully customizable products, and are one machine that creates finished products as users digitally design. IP lawyer John Hornick states in his book 3D Printing Will Rock the World, that for these reasons, parts manufacturing companies will be the first to be overtaken by 3D printing with consumer products soon to follow (Hornick, 2015). For the sports industry, most of the manufacturing of consumer products falls under the category of sporting goods and equipment. These include major sporting brands such as Nike, Adidas, and Under Armour. It should be noted that the creation of sporting goods is by no means a small part of the overall sports industry, “The market for sporting goods in the United States has a projected value of almost $65 billion, and recreational transport and the equipment category accounts for 25 to 30 billion U.S. dollars in consumer purchases” (Jaaskelainen, 2016). The above reasons are just part of why sporting good manufacturers and users see value in use of 3D printing technology. Currently 3D printing can be regarded as a mutually beneficial innovation for sport equipment brands and consumers. Overall it is primarily the customization capability, and low cost accessibility of the products 3D printing technology can create, that provides the most value to industry stakeholders.
Customization
Certainly, the ability to fully customize products with 3D printing is the most prevalent way that the sport industry sector has been using the technology. For sporting goods manufacturing companies, the sporting equipment products they create are primarily for athlete use. The challenge with making sport athlete centered products is that every athlete is different. Additionally athlete consumers typically desire products that will improve performance, or to which brand they identify with. Providing athletes with custom equipment that will improve performance is in part what a big draw to what 3D printing manufacturing in sports is doing. In Matt Barker’s research article 3D printing future use in sports, he explains why customized sport equipment can be advantageous, “Shoes, protective padding and mouth-guards are all examples of items which could be improved for each individual user by exact dimension measurements that are customized for each wearer. This will drastically improve performance in certain sports, and be attractive to those who like their own perfectly fitting gear.” (Barker .2016). The infamous sporting gear / apparel company Nike, has invested into the broad customization capabilities of 3D printing technology to manufacture better and new types of products such as shoes, shin guards, and duffel bags. According to Keith Nelson with Digital Trends, the use of 3D printing started for Nike back in 2012 when it filed a patent for implementing 3D printing technology to automate the process of affixing the shoes upper to the midsole (Nelson, 2015). Nike representatives have explained that the customization and simplification of creating athletic shoes using 3D printing, is beneficial to them because “the number of shoe pieces being added has increased, requiring increasingly complicated manufacturing steps to produce shoes.” (Nelson, 2015).
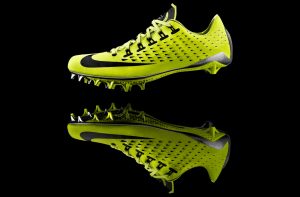
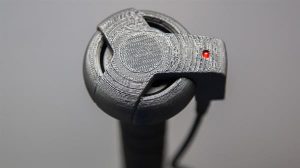
NIKE 1st 3d printed shoe
Although Nike is a relatively early adopter in filing patents revolving around 3D printing, the other major sport equipment brands such as Under Armour, Adidas, and Reebok are by no means lagging behind in using the technology in creating their products. In 2015 Adidas unveiled its Futurecraft 3D initiative (Video Linked), which according to the company is “ a unique 3D-printed running shoe midsole which could be tailored to the cushioning needs of an individual’s foot” (Banks, 2016). Footwear products are a major source of revenue for sport equipment brands. These sport manufacturers see value in 3D printing technologies broad range of customization capabilities, because they can create solutions that advances the development of innovative sporting equipment. As sport gear companies such as Nike or Adidas continue to develop there 3D printing manufacturing technology, there will likely be an increase in the creation of tailor made equipment for individual athletes.
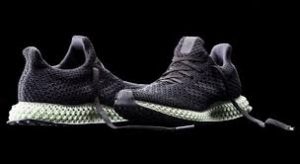
Adidas Future Craft 4D.. 3D printed shoe using Carbon’s technology, the material is springy and able to bounce back
Moreover, the customization capabilities of 3D printing is also good news for the actual users of sport equipment, as they have the capabilities to print products themselves. As 3D printers become more broadly accessible across communities and into homes, the potential for domestic sports equipment production increases. Sport equipment users will begin to turn into makers of their own. Therefore they will create their own customized products through 3D printing, which has major implications on the sports industry as this begins to blur the lines between the manufacturer and customer. Users 3D printing their own sport equipment is a reality that stakeholders in the sporting goods industry face today, and one that will continue to increase given available access to technology of 3D printing. One such case of this reality is evident with a group of Engineers as they have developed a new 3D printing technique that can “ enable a vast range of composite materials; things like tennis rackets and golf clubs, to be printed easily and at a low-cost in people’s homes ( Barker,2016). Although some sports equipment such as golf clubs or tennis rackets will be challenging to 3D print domestically with typical consumer printers for most people in the near future.

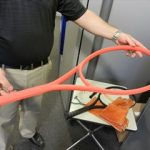
Engineers from the University of Bristol have started processes to 3D print composites. pioneered a way to 3-D print composite structures using ultrasonic sound. This would allow them to print custom golf clubs and tennis rackets
Regardless, there are still athletes as well as ordinary consumers making their own custom sports equipment with access to 3D printers in recent years. One such case is with Arielle Rausin, who is a Paralympic wheelchair-racing athlete at the University of Illinois. Arielle designs and prints her own set of wheelchair racing gloves, by scanning her hand as a digital file so as to print custom fit 3D printed plastic racing gloves. According to Rausin having custom racing gloves are an important piece of equipment in being able to rotate the wheels on the specialized racing chairs, but the main existing option for these gloves cost around $350 and took 12 hours to make each using molds (Beckman, 2017). Ultimately using the capabilities of a standard consumer model 3D printer, Arielle is able to create her own custom fit gloves through her company Ingenium that are “lighter, cheaper at $4 per glove, durable, and take less time to make”(Beckman,2017).
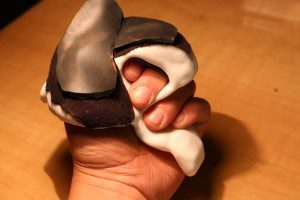
Custom Fit 3D printed wheelchair Racing Glove

Arielle Rausin wearing the custom 3D printed gloves she created
In another similar case, a New York high school senior named Thomas Desimone digitally modified and 3D printed lacrosse stick heads in order to make it possible for special needs players to learn and play the sport. With assistance from his Lacrosse team the Challengers, they were able to successfully print custom plastic material lacrosse stick heads by “Manipulated the lacrosse stick head design using CAD software to make it larger and lighter, so as to be easier to use for kids with special needs (Sims, 2016). In both Thomas and Arielle’s case, they made completely custom made sports equipment domestically. More intriguingly both of them created types of equipment that did not technically exist and were not possible at an individual user level before 3D printing. Outside of the cases where new types of custom products are created, users with 3D printer access can also print and customize their own sport equipment through existing files that are shared to community sites such as Thingiverse. Although most of the sports equipment that users can print themselves is limited by factors such as the type of 3D printer or material required. Even so the ability of the public to be able to print sport equipment files such as golf tees to lacrosse stick heads without the need of a retailer, is still of great value to users.
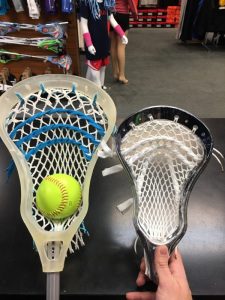
Thomas Desimione: 3D printed Modified Lacrosse sticks
Sporting equipment is a broad term, and there are many different types of equipment for specific sports and recreational activities. Some types of equipment will be more challenging and expensive to 3D print than others. Eventually 3D printing of files of advanced sports equipment at the user level is not implausible, and will likely revolutionize the way consumers, retailers, and manufacturers interact in the sport equipment industry. The capabilities to create customized sport products is a primary reason as to why the use of 3D printing technology is valuable to sporting good brands as well as users alike. Customization is clearly a factor that makes 3D printing technology of value to multiple stakeholders in the sport gear and recreation industry. Use of 3D printing to create customized sport products will likely continue to increase in sport product manufacturing, and on the individual maker side as 3D printers continue to become accessible to consumers.
Low Cost & Accessibility
Secondly, the ability for 3D printing technology to create sport gear at a lower cost is another major reason to why the technology is valuable to sport brands and users alike. For sport manufacturing companies 3D printing technology is simply more cost effective. 3D printing technology typically lowers costs for manufacturers because it is able to have products be designed and created quickly, it is efficient in not wasting material, and it eliminates many costly expenses such as human labor and use of multiple machines. Alex Mcglenn a 3D printing researcher states in his article“How 3D Printing Has and Will Affect Sports”, that all major sport equipment manufacturers have implemented 3D printing into their manufacturing process. “ The ability to quickly and easily design, create, and test a product is invaluable and rapidly speeds up the production timeline… the opportunity to easily alter the design and functionality of items, makes it invaluable to concept creators” ( Mcglenn,2016). In 2012 when Nike initially started implementing 3D printing into the manufacturing process for their new football cleats (Nike 3D printing manufacturing Video), 3D printing “simplified the increasingly complex process involved in manufacturing athletic shoes and reduced human labor for Nike” (Nelson,2015). It is important to note that presently Nike and other major sport equipment manufacturers typically still use a combination of human labor and existing machines when it comes to creating the broad variety of products they produce. Even so it is clear that these companies are all continuing to move towards further implementing 3D printing technology in part because of how cost effective it can be.
Meanwhile from a user or athlete’s perspective, the capability of 3D printers to potentially lower the cost of creating certain equipment is beneficial in that it could make certain sports more accessible to participate in. This is particularly true when it comes to the manufacturing of adaptive sports equipment such as wheelchairs or prosthetics. In order for disabled athletes to play in particular sports, they typically require adapted equipment to allow them to participate. In the Sport Techie research article “3D Printing Technology Looks To Increase Participation In Adaptive Sports”, Howard Brodwin founder of Sports and Social Change found that 3D printing manufacturing provides a great deal of value to the sport. In his research involvement with a wheelchair sports team at UCLA, he found that high cost of current adaptive equipment was a huge barrier to entry for many disabled athletes. In regards to the impact that 3D printing capabilities has on adaptive sports, Howard stated that it “…gives athletes the ability to be provided service for their broken or damaged equipment almost immediately, without the trouble of waiting for new parts from a manufacturer. This innovation would not only help lower the cost of new equipment, but give more people who are disabled the ability to both afford, as well as take part in the recreation” (Wistreich, 2015).
3D printed Custom Sports Wheel Chair Seat
Additionally a 2015 Sports Digest research article titled 3D Printing: A Future in the Sports Industry, further elaborated that the impact from 3D printing is beneficial to removing financial barriers for a user to participate in adaptive sports such as with the printing of custom prosthetics. “ The affordability of 3D printing can now reach those who normally would not be able to incur the cost of a more expensive and sometimes clunky prosthetics. The prosthetics have been completely customized for maximal comfort and offer the same usability as a pricey “traditional” counterpart” (3D Printing In Sports, 2017). In her interview Ariel Rausin the creator of custom 3D printed racing gloves, reiterated a similar sentiment regarding the importance of the value of low cost and accessible adaptive sport equipment that 3D printing provides. “If it was easy to make and produce these gloves, it might be one less barrier people have to enter into wheelchair racing.” (Beckman,2017). Accessibility and breaking down barriers to enable participation is an area that 3D printing is clearly having a positive impact for participants in adaptive sports. Adaptive Sports is certainly not the only sport that is more accessible by potential of 3D printing technology minimizing barriers to entry by lowering equipment costs. Sports such as Ice Hockey, Lacrosse, Golf, and any sport that limits participant entry with high cost equipment, will find value in the low cost manufacturing that growth of 3D printing technology provides.

3D Printing and Adaptive Sports. Prosthetic can be custom made, and are higher quality with 3D prints
Current and Dynamic Uses of 3D printing in Sports Products
Unsurprisingly, there are much different type of ways that 3D printing technology is used within the sports industry. As covered above, sport manufacturing companies and users find value through 3D printing technology mostly because of the limitless product customization capabilities, and cost efficiency of making that the technology can provide. Because of the technology capabilities, 3D printing is being used in almost every type of sports product manufacturing capacity currently. It is innovating tangible sporting equipment at every level, and even creating sport products that have not existed previously. Some examples of 3D printing currently being used by sport companies and users to innovate sport specific equipment include
- Baseball Bats: “Rip-It Sports created the Smart BAT. The bat is made with a combination of 3D printing and smart technology giving it the ability to provide the hitter with real-time data, swing speed, and contact analytics for each swing and hit made” ( Ryan,2017)
- Snowboard Bindings: “ Creation of more flexible alternative, gives snowboarders more control, comfort and flexibility in binding” (Ryan, 2017 )
- Golf Clubs: “ US golf club manufacturer, Ping, produces a stronger golf club than traditional casting methods. The 3D printing process is also actually easier and quicker compared with traditional processes” (Ryan, 2017) Ping creates VIP customized golf clubs for $8,000-$10,000. Price will come down as 3D printing gets cheaper
- Small Parts: Insoles (worn down shoes), bicycle handlebars, recreation machine parts, etc…
3D Printed Bat with computer data chip to track swing data such as MPH, bat speed, contact, etc.
In terms of Sport gear and apparel companies, Nike has been one of the first and best sport manufacturers to implement 3D printing technology for a variety of uses (Why Nike Invests in 3D printing Video). Although Nike and most major sport gear brands do not use 3D printing exclusively in manufacturing quite yet, their president of innovation Tom Clarke stated in Dec 2016 how Nike plans to increase use of the technology with their athletic footwear. “ We’ve been using 3D printing to create new performance innovations for footwear for the past several years. Now we are excited to partner with HP to accelerate and scale our existing capabilities as we continue to explore new ways to manufacture performance products to help athletes reach their full potential.” (Banks, 2016). Nike has made 3D printing technology a major part of innovating their shoe line from the creation of the Nike Vapor Cleats in 2014, which were developed to increase athletic agility for football. Nevertheless, shoes have not been the only major product Sport Apparel companies have used 3D printing for. In 2014 Nike also developed 3D printed lightweight duffel bags, and more significantly the Mercurial FlyLite shin guards which provide “a revolutionary lightweight and shock-absorbent material for use in sport protection” (3D Printing: A Future in the Sports Industry,2015). The 3D printed shock absorbent material innovation is something that can even be extend to protection equipment product lines such as helmets and other padding. In addition to equipment, Under Armour and Reebok have even been 3D printing “preliminary models” of accessories and apparel for their products.
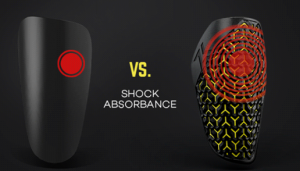
Nike 3D printed Shin Guard. Improved High Impact Absorbing Material
Finally, there are several medical / sport related products that are using 3D printing capabilities. As has been extensively covered, 3D printing is beneficial in providing equipment for disabled individuals to participate in adaptive sports. 3D printing technology provides lower cost access for participants through the creation prosthetic limbs that are lower cost and better quality, as well as custom adaptive wheelchair parts. Similar to Nike’s innovative 3D printed impact shin guards, the technology also could offer potential solutions with protective gear such as helmets. Currently mouth guards used by many athletes for contact sports, are increasingly made with 3D printing technology where they are custom fitted to players mouths to provide extra levels of comfort and safety (Takao, 2015). Finally, 3D printing technology has revolutionized the improvement of sports medicine machines and training processes in recent years, by making them “intrinsically better…The machines used in sports medicine help rehabilitate injured players can be fixed quickly and easily using the technology. The 3D printers are able to create the medical equipment so a team or medical facility never has to wait weeks for a single component ( Mcglenn,2016 ).

3D printed mouth guards. One of many examples of custom fitted gear that is used for improved impact protection.
Future implications for 3D Printing and Sports Manufacturing
3D printing already has, and will continue to revolutionize how sport equipment is made. The technology is being used to benefit multiple areas of creation of sport products, including equipment, gear / apparel, and sport medicine. It is also revolutionizing who is making the sports equipment as well. Sporting good companies are investing in 3D printing to create equipment that is custom tailored to their consumers and increase the quality of their products. For sport product manufacturers 3D printing technology is currently, and looks to be the way of the future in terms of creating and delivering innovative products to consumers. For sport product consumers, they will likely continue to see an increase in mass customization of tailor made products. As 3D printing becomes cheaper and accessible to more people, it is also highly likely that sport products will become less costly and more accessible to users to print themselves.

Sport Retailers will be forced to adapt to the maker movement. At some point in the future, users will be able to much more easily access files to print the products they need
Most importantly, the spread of the maker movement with increase in sharing of design and domestic making of things such as sports equipment, will have major implications on the sports industry entirely. Even average athletes starting to create and 3D print their own equipment; will further blur the lines between sports product manufacturers and customers. Sports Retail businesses will likely face many challenges ahead. As the maker movement increases with at home domestic creation of sport products, the sports retail stores purpose will come into question, since users can download a file and print equipment at home or a local 3D print business. The Sports Digest Journal predicts a bright future for the sports industry and 3D printing, where retail stores adjust to “ printing customized sports equipment on demand for an athlete’s specific needs could soon sweep across stores like Academy Sports, Nike, or Dick’s Sporting Goods”( 3D Printing: A Future in the Sports Industry,2015). Sport Equipment retail stores such as Dicks Sporting Goods embracing 3D printing may be the first step into the future of sport product making and consumer purchasing. However Nike’s COO Erick Sprunk stated in 2015, that the industry will get to a point where “ Consumers will one day be able to buy a shoe design file from Nike and 3D print the shoe themselves” (Nelson, 2015).
-
- Consumers will have continually increasing ability to download sport equipment files. Increasing levels of 3D printing from domestic users will start to blur the lines between manufacturers and customers. All apart of the maker movement!
-
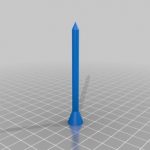
- Golf Tee available to download on thingiverse
-
- Baseball available for download on thingiverse
Eventually 3D printing of files of sports equipment at the user level is not implausible, and will likely revolutionize the sport equipment industry. The end users of sport products will likely become sellers, and creators of more sport products themselves. 3D printing technology and the maker movement, by all evidence, is set to continue to make a tremendous impact on the sporting goods industry.
For additional resources and information on developments within the sports product industry and 3D printing, please see the below 3D print website for articles, designs, and case studies https://3dprint.com/tag/3d-printed-sports-equipment/
References
3D Printing: A Future in the Sports Industry (2015)
Ryan, Matthew. 3D Printing In Sports. (2017, May 08)., from https.hwtrek.com/lifestyle-technology/3d-printing-in-sports
Banks, A. (2016, December 16). 3D Printed Shoes: Here’s Who is Winning the Battle & Why?, from http://www.highsnobiety.com/2016/12/15/3d-printed-shoes-nike-adidas/
Barker, M. (2016, January 27). A Glimpse Into The Future Of 3D Printing In Sports., from http://www.sporttechie.com/a-glimpse-into-the-future-of-3d-printing-in-sports/
Beckman Institute for Advanced Science and Technology. (2017). VIDEO: Rausin Creates 3D Printed Wheelchair Racing Gloves for Paralympians. Retrieved May 11, 2017, from https://beckman.illinois.edu/news/2016/08/wheelchair-racing
Hornick, John F. 3D Printing Will Rock the World. North Charleston, SC: CreateSpace Independent Platform, 2015. Print.
Jaaskelainen, L. (2016, November 01). Topic: Sporting Goods Industry, from https://www.statista.com/topics/961/sporting-goods
Mcglenn, A. How 3D Printing Has And Will Affect Sports. (n.d.). from http://www.fabbaloo.com/blog/2016/9/14/how-3d-printing-has-and-will-affect-sports
Nelson, Keith. (2015, October 15). Nike was just granted a key patent for 3D printed shoe technology., from https://www.digitaltrends.com/cool-tech/nike-patents-3d-printed-shoe-technology/#ixzz4gimyKF30
Sims, G. (2016, November 08). Advancements in 3D Printed Sports Equipment. from https://3dstartpoint.com/advancements-in-3d-printed-sports-equipment/
Takao, K., Tetsuya, T., Hidetoshi, T., Shingo, K., Chika, S., Toshimasa, O., & …
Daisuke, K. (2015). The Possibility of Fabrication for Sports Mouthguards Using a Three-Dimensional Ink-Jet Printer. Japanese Journal Of Sports Dentistry, 18(2), 65-69.
Wistreich, B. (2015, August 09). 3D Printing Technology Looks To Increase Participation In Adaptive Sports, from http://www.sporttechie.com/3d-printing-technology-looks-increase-participation-adaptive-sports/