Making 3D Printed Prosthetics with e-NABLING the Future

A selection of the hands available on e-NABLING the Future’s website

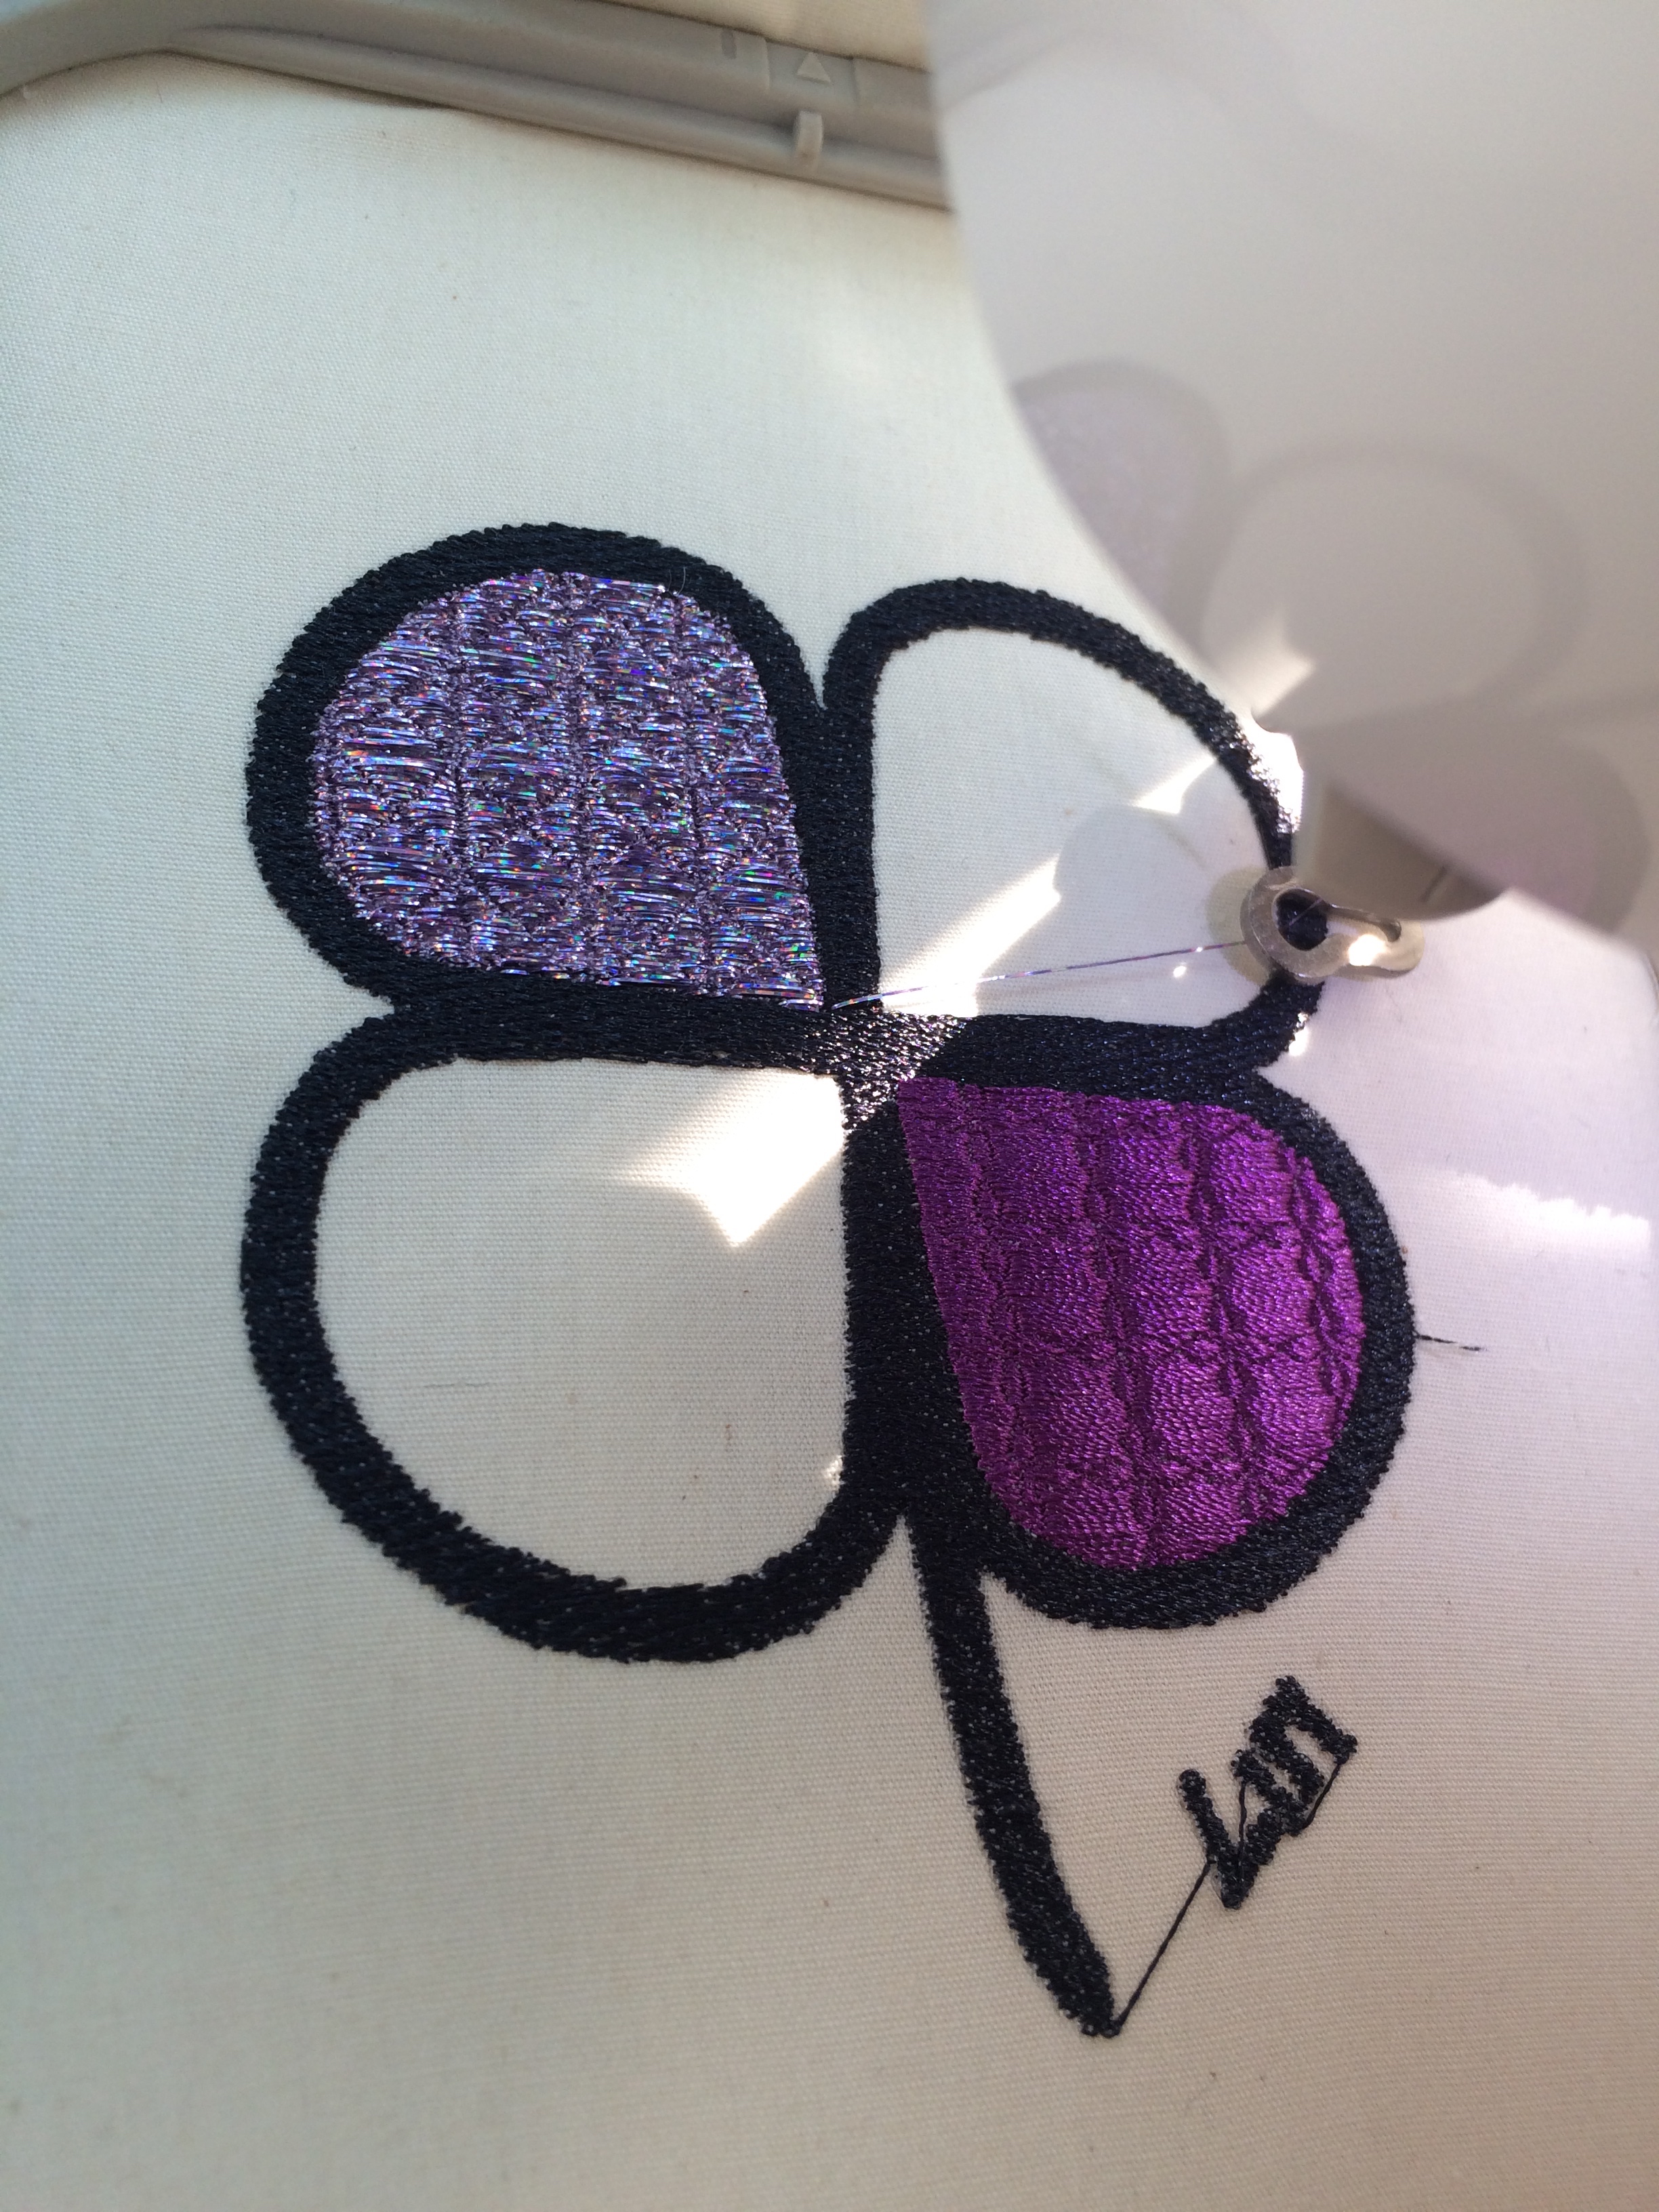
This semester Nora and I worked with Enabling the Future on designing and printing 3D prosthetics. Nora found the company and Vishal helped with getting in touch with the e-NABLE team at SXSW. From there we had our first assignment. In order to be certified by e-NABLE to make prosthetic devices for real people, we had to first print and assemble a prototype hand. The designs are premade so they just need to be printed. In some cases, the hands or fingers need to be resized to fit the end user. Our first hand was called the Raptor Reloaded, printed in black and blue filament. Printing the materials was quite easy compared to assembling the hand. The instructions were available online with detailed pictures and descriptions. The assembling process taught us a lot about how best to make the hand and what were some obstacles that we faced. For example, a lot of the parts needed to be filed down so that it would fit easily together. We also worked with the tensioning in the fingers so the hand would move properly and learned how to tie some pretty complicated sailor knots that the site suggested we use for the hand.

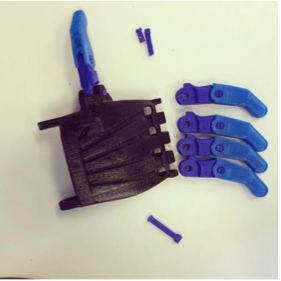
Our first Raptor Reloaded part-way through assembyl


After the first hand was sent in, we decided to print another Raptor Reloaded to be used as a sample in the Maker Lab for future students that are interested in the project. The process was very similar to the first one except we didn’t have all of the assembling materials needed for the hand such as the strings, screws, and Velcro. Enabling the Future sells packages that cost around $25 for materials for the Raptor Reloaded. Instead of buying another package, we improvised with some of our own materials. Feel free to check out the hand in the Maker Lab during open hours!

Screen Shot 2015-05-11 at 7.19.20 PM

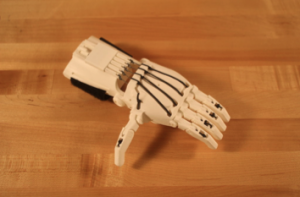
Our second Raptor Reloaded

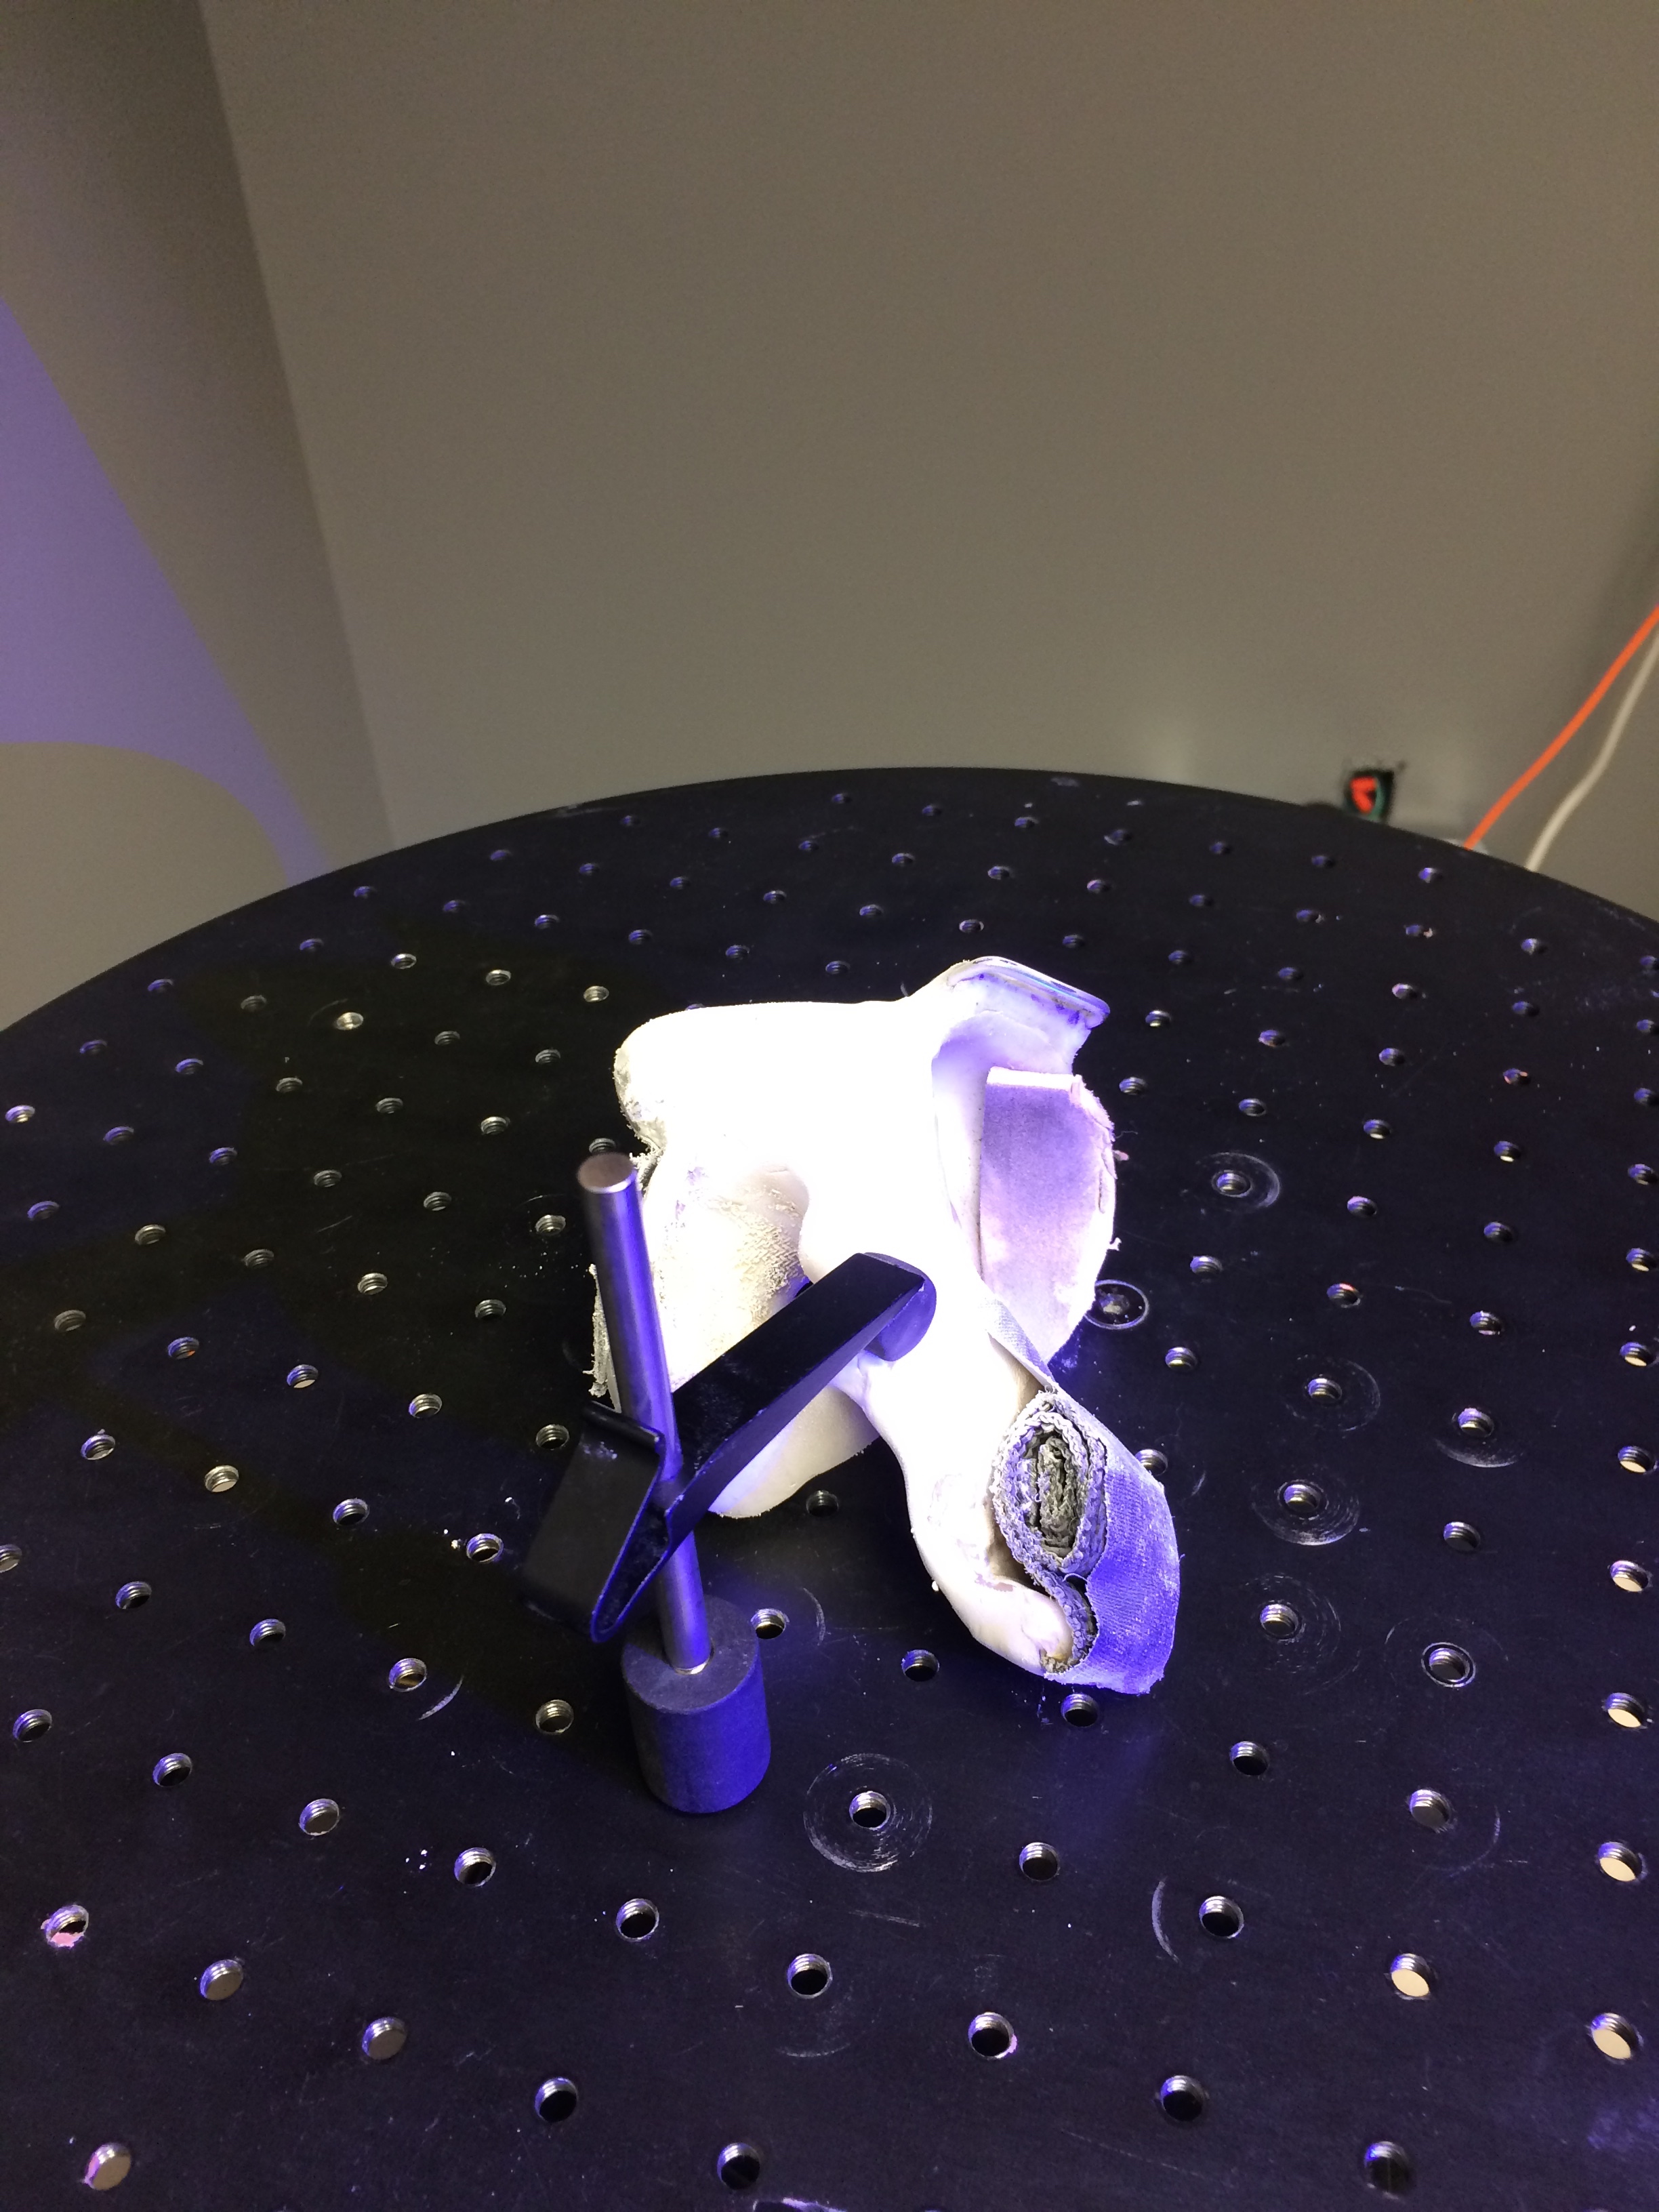
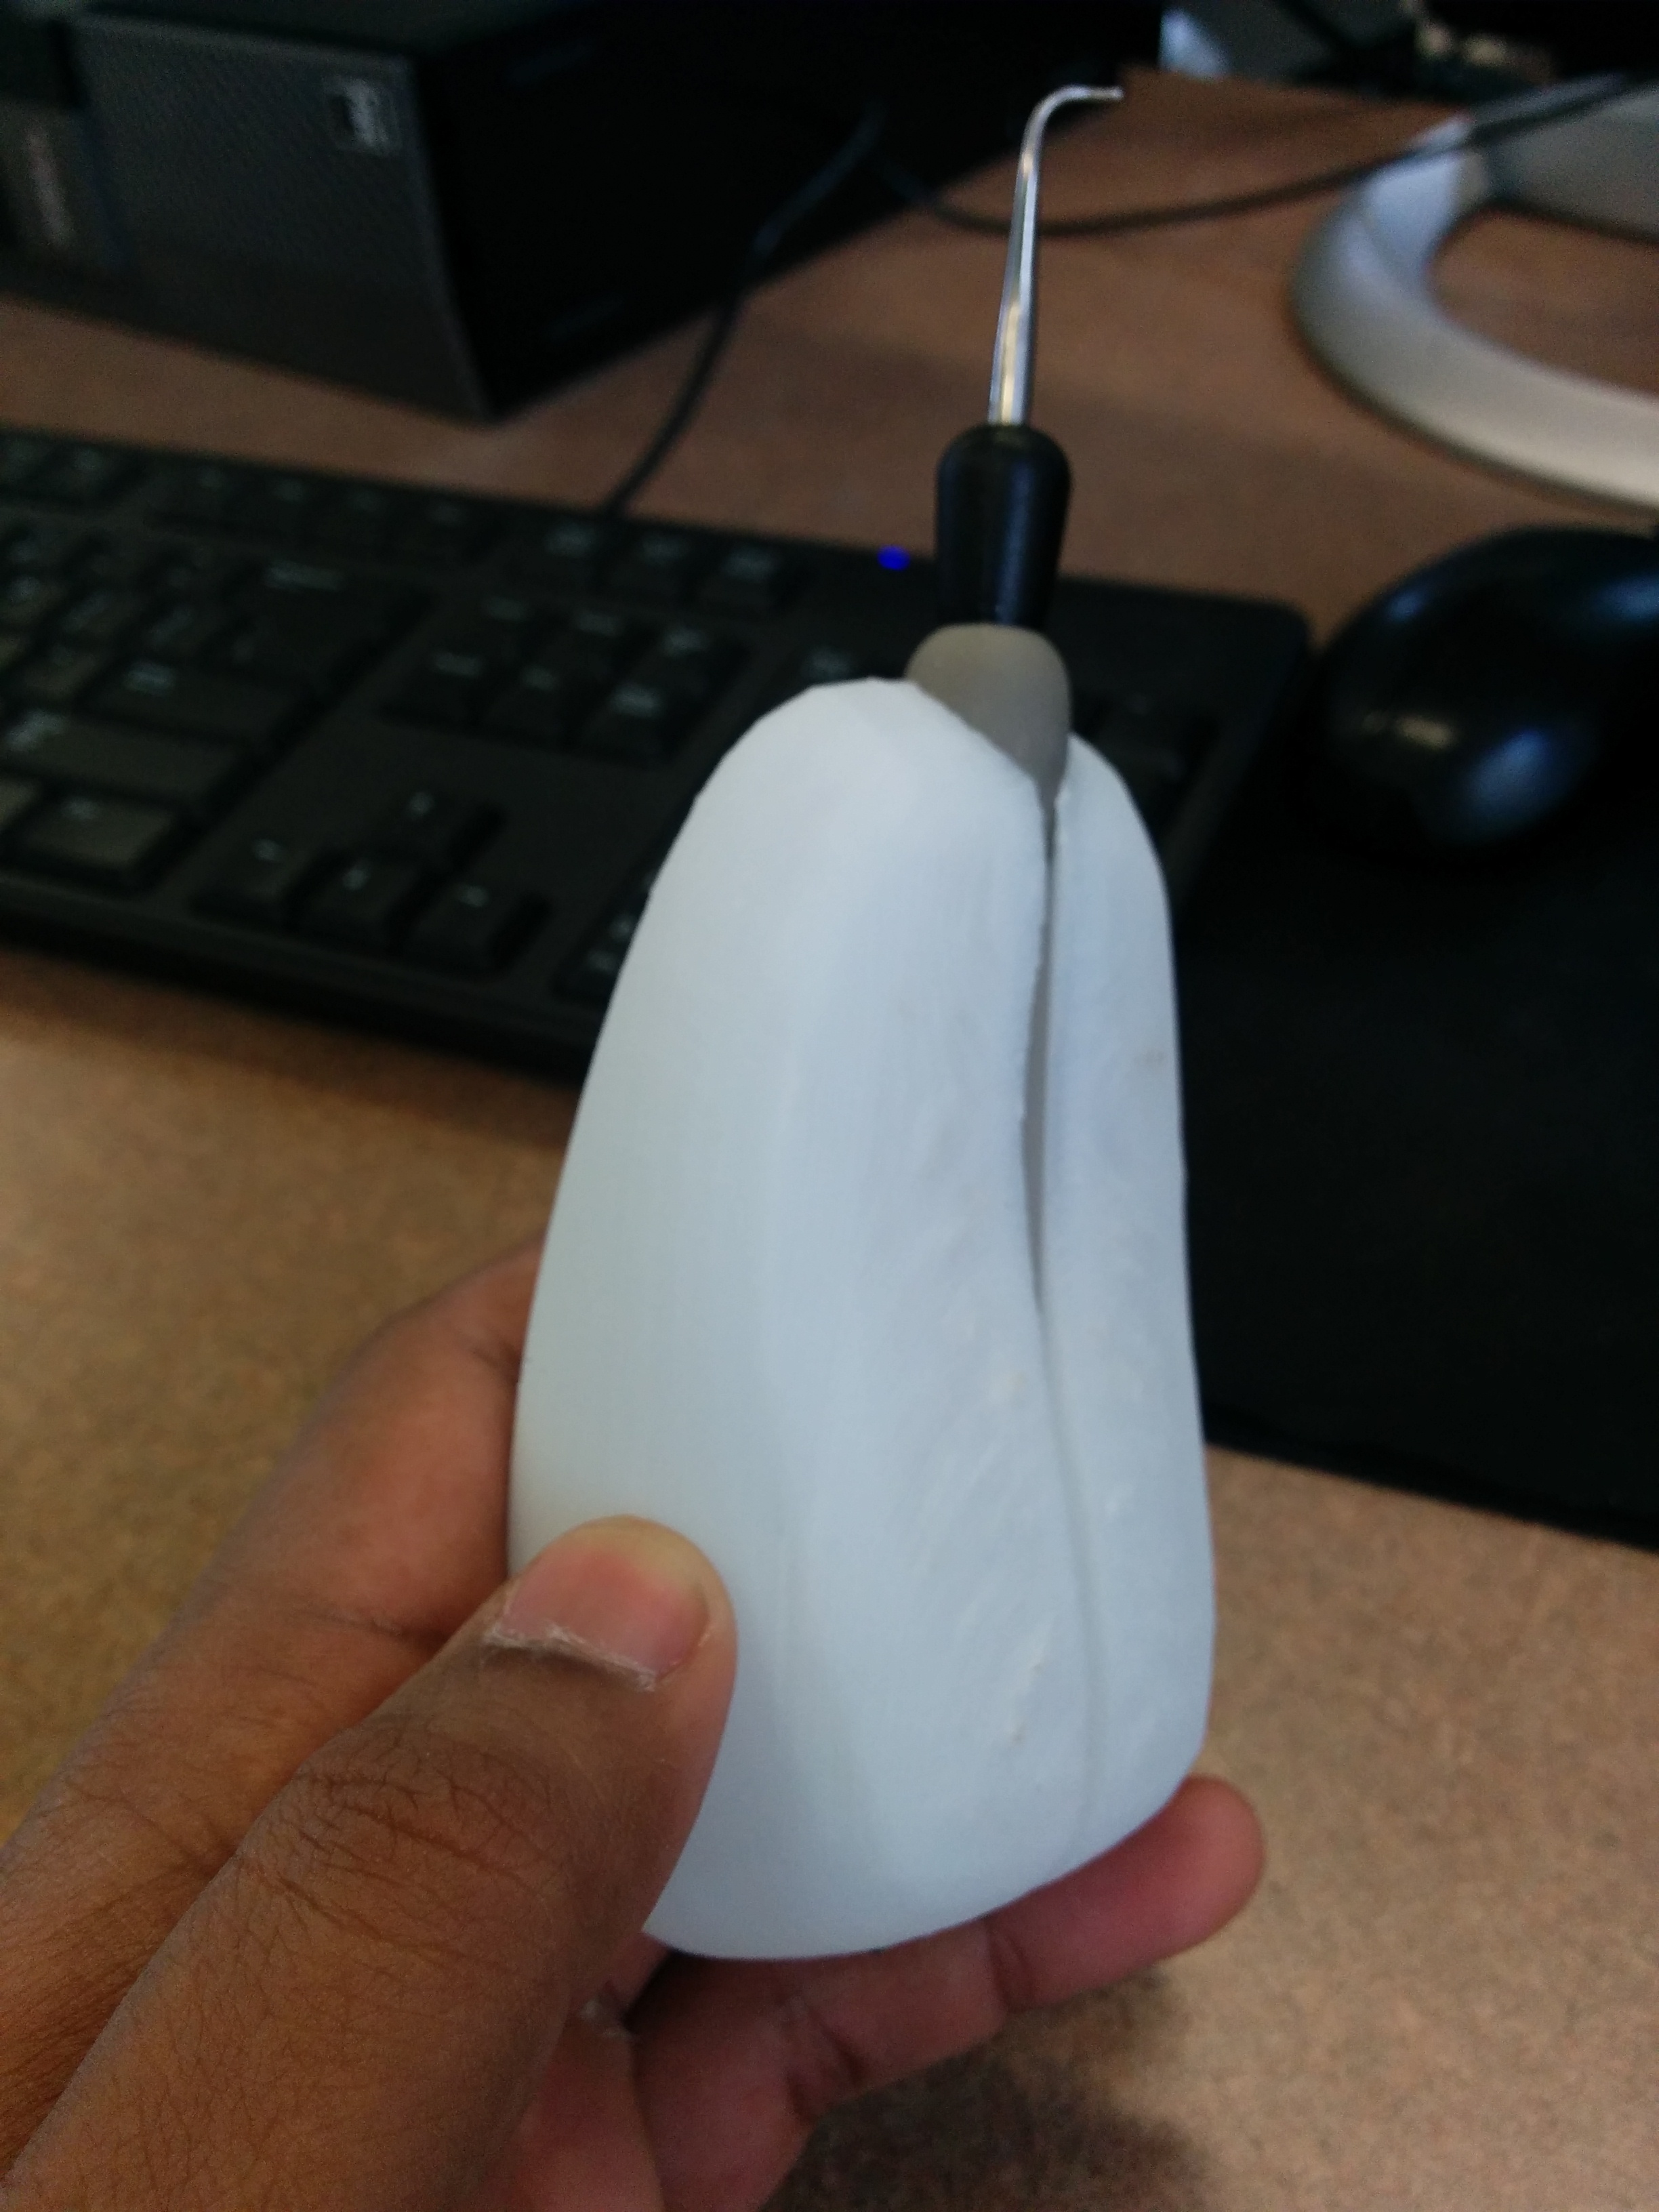
Towards the end of the semester, the e-NABLE team got back to us about a real recipient, his name is Bruce and he is a 53 year old male from North Carolina. He is missing three of his fingers on the right hand, so instead of making a prosthetic hand we were tasked with making replacement fingers. Some sizing needed to be done in the fingers, but other than that the prints were ready. The instructions for the Owen Replacement Finger were also available online; however, they were not as detailed as the Raptor hand. We also had to improvise on getting the necessary materials such as a glove, needle and thread, and elastic, which were not available in a pre-made kit for this type of hand.

Screen Shot 2015-05-11 at 7.19.34 PM

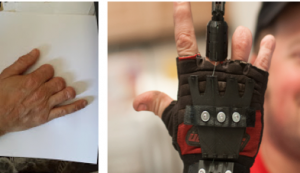
Our first recipient’s hand without a prosthetic and the Owen Replacement finger hand

One Door Closes, and Many More Open: Digital Making 2015

Time has flown by and the end of the semester is quickly approaching. Though this is a relief in some of my classes, in Digital Making it is a sad goodbye. I signed up for the class wanting to learn all I could about Digital Making, and am going to miss having three hours set aside every Tuesday afternoon to do just that.

Some of the projects I worked on during my Digital Making semester.

This class has definitely been a journey for me and has taught me about a whole new world of resources (and people) out there that will be helpful to me as I continue my making journey here at UIUC and beyond. From gaining new knowledge about 3D modeling and printing through the BIF MakerLab classes and our session with Autodesk, to learning all about scanning and preparing them for printing in our sessions with the Beckman Lab, to discovering the plethora of resources-including digital embroidery machines, laser cutters, and Arduinos (to name a few)-available to us through the Champaign Urbana Community Fab lab, to learning all about the amazing organization that is e-NABLING the Future through my semester-long project, my Digital Making semester has truly been an eye opening experience. Its sad for me to see the semester ending feeling like there’s so much more to learn, but I definitely feel prepared to do so if I can get myself to set aside the time.

If there’s one key thing I took away from this semester it is not to be intimidated to try things out. Though the idea of building 3D printed prosthetic hands, or creating something with a laser cutter, or coding an Ardiuno to sense light levels would all have sounded super intimidating to me at the start of this spring, I’ve done all of these things in Digital Making and none of them were really that hard! Moving forward, I’m definitely going to have a much easier time taking on scary sounding projects and using the resources available to me to figure out how to make them a reality. One example of this is a project I’m thinking about taking on myself this summer: building a 3D printer from scratch. My department offers some small grants for students to take on research and projects over the summer, and as soon as I saw the email about the offer I thought, “There has to be some way I can use this to continue with Digital Making!.” Not long after Vishal posted something about building a $200 3D printer and immediately I thought, “This is perfect!”. I’m still waiting to hear back from my advisor about sponsorship, but I think this is a great example of how I’ve grown. Building a 3D printer would have sounded crazy to me before this class, but now I’m thinking of it as an adventure I could definitely figure out with some persistence.

And I see that as just the start. I still have three more semesters to spend time tinkering at the CU Fab Lab and now working at the BIF MakerLab and lots of projects I want to take on and tools I want to explore. This curiosity in combination with the people I’ve meet-both inside the class and outside of it-are a great starting point for me to take my making skills and knowledge to the next level. And its obvious I’m not the only one who feels that way. Through my classmates presentations in our last class reflecting on their semester long projects and their own journeys of learning and their own recent reflections, it seems pretty clear that I will not be the only one hanging out in the MakerLab next semester.

Its very exciting to see how everyone has grown and interpreted the class materials in their own unique way. From Kays project Making 3D art with Math to Arielle and Cos. project making wheelchair racing gloves with 3D printing and scanning, we’ve each brought making skills into our life in different (and awesome!) ways. For me personally this has been a great addition to my concentration in Product Design and a very interesting way to apply my engineering education to actually making real things (something that doesn’t happen very often in theoretically-focused undergraduate classed). Talking to additive manufacturing-focused companies and visiting Deloitte through this class has opened my eyes to the new areas of opportunity opening up to people with making knowledge and has helped encourage me to seek out and apply for opportunities in this area-like hackathons and additive manufacturing related jobs and internships. Already a number of doors have been opened to me, including the opportunity to attend hackathons at Stanford and NYU Abu Dhabi and the grant I mentioned earlier on, partially because of the new skills I’ve gained in this class. All in all, it has been a very productive semester and I am looking forward to all the making opportunities and projects the future holds for me.

LIN’s Semester Learning Portfolio

Time flies!

I couldn’t believe that it is time to say goodbye to Spring 2015 semester. Digital Making Seminar was one of the best courses I have ever had at college. Not only because of the latest and hottest technologies and skills I gained throughout the semester, but also because of you talents. The class was a good combo of people with different academics background. Students in arts, business, engineering, science and so on amazingly mixed and matched with each other. Every one was here with interests and enthusiasm in “Learn, Make, Share”.

Our section was held every Tuesday afternoon for 3 hours. It gave the class a good amount of time to pick up new technics. But it may also leave you hungry during the session. Don’t worry. Pizzas got your back. Guest speakers visited the class to give speeches and pizzas along with for half of the semester.

In beginning of the class, the first guest speaker, Zach Simkin – President and Founder of Senvol, introduced the impact of 3D printing technology on supply chain. I asked him about the quality guaranteed period of digital making products in comparing to regular manufacturing products. From there, I realized the importance of digital making procedure on efficiency enhancement, quality control, and even more. Meanwhile, I also got to know everybody in the class through ice-breaking activity.

We began to brainstorming ideas and create simple design with TinkerCad and MakerBot from the following class. That was when I formed group with Jill and Kavin, and we remained as a team since then. The class was assigned to make a group name card that can represent each team as a whole. So we listed the initials of our first names in alphabet order (J, K, L) on the name card. The printout was in orange, which is the university’s color.

From week four, the class had focused on individual projects and self interests. I used basic desktop scanning, TinkerCad, and Makerbot to create a 3D self-portrait.

IMG_5320 IMG_5322

The printout in the left photo is the original without additional touch and cleanup. The one on the right shows the look after cleaning and polishing.

Fusion 360 was the most difficult software I learned in the class. We’ve been using it for two weeks. I decided to work on creating a screw with it. It seemed to be a practical project in tutorial videos found on Youtube.

Screw

Here’s a snapshot at the middle of the progress. I thought that Fusion 360 does not as beginner-friendly as TinkerCad. However, it is designed to create technical items that may be massively produced in industries, whereas TinkerCad is more likely for personal interests in 3D printing.

One of the specialties of Digital Making Seminar was having the opportunities to visit different labs across the campus. Throughout the semester, we have been taking classes at Maker Lab, Fab Lab, and Beckman Center. Within the session at beckman Center, One of my teammates came up with a racer glove. It is a customized wheelchair racing equipment. If we figured out the way to use 3D scanning technology to make gloves, then it would significantly reduce the costs and inputs of the process. In addition, customers are able to order mass customization.

IMG_5211 IMG_5213

The scanner was working on analyzing and copying the white racing glove. Then, the data and imagine could be adjusted and enriched with Geomagic software.

Back from spring break, there was a three-week learning program at Fab Lab. I had a lot of fun at here. The class was assigned to three topics: Arduino, Digital Embroidery, and Laser Cutting. Each week we switched to a new program and continued working with amazing staffs at the lab. I began from using SewArt app to create patterns on fabric to design silhouette with Inkscape computer software, and wrapped up with learning arduino and relative software to create inductive sensor.

IMG_5810 IMG_5812

The above are photos of my work made with digital embroidery. It is a purple clove and each leaf was in different thread styles.

IMG_5900 IMG_5901 IMG_5902Another object was using laser machine to carve patterns on wood. I tried to make a pattern which combines word “Chicago” and several of its famous buildings as the background on a piece of wood. These are pictures of the view of the piece on computer, during working, and after completed.

IMG_6059 IMG_6060

My last task was learning to use arduino and relative software to create inductive sensor. Th photos reflect the sample code – Blink.

In terms of final portfolio, some the class chose to work on individual project, others teamed up with two to three persons to accomplish big subjects. I was with Jill and Kavin. We named the team JKLOL. Our project is a bean-like silicon grib helper that aimed to make life easier for the elder with weak arm muscles. It took us the last three weeks to design, research, collect data, ask professional’s opinion, and finally have it printed

Lima Gripper IMG_20150412_101551

Theses are the look of the “bean” on screen and printout.

 All in all, I was thrilled to see how far the class have been along the semester. Everyone in the class was fulfilled with knowledge, information, and skills to “Lean, Make, Share” within and beyond the course.

Week 16 Reflection – Project Final Post

During the last week of the course, we have given final portfolio presentation to the public. Besides the entire class and Professor Sachdev, we also welcomed Fab Lab staffs, professors from other sections, and a career advisor to attend the presentation. I participated the CU Make – Make a Thon event. Jill, Kavin and I are the team.

Our project called BeanGrip. It is a silicon based grip helper for people with weak arm muscles. It took us three weeks to come our the final prototype. The process began from model design, dimension setup, and issue diagnose to computer moulding, 3D prototype printout, and final adjustment. Though we was not able to display our final version of the project at the presentation because of 3D printer problem, the technologies we learned, skills we practiced, and fun we shared will be appreciated.

At the presentation, Kavin introduced the idea and purpose of our project, I explained the dimension measuring process whereas Jill talked about design and molding process. We nailed our presentation with attractive and clarified information.

11208860_10155954739645131_1799965470_n11262234_10155954740155131_722896741_nThese are photos taken after the class with Professor Sachdev, Kavin, and Jill. Thanks to the course for introducing all of you talents to me. I appreciate the help you guys offered me and the knowledge I gained from the course. It is an amazing experience to be the fist generation of Digital Making Seminar. Wish you all a great summer. Hope to see you soon.

With love and affection.

Semester Learning Portfolio

In the Spring 2015, my last semester in college, I took by far one of the most interesting and hands on rich classes in the College of Business. As you already guessed it was a Digital Making class taught by professor Vishal Sachdev. The class had about 20 students and was very diverse in the students backgrounds, in fact we had business majors, engineers and journalists. It was nothing like other classes in our college, it was an absolutely unique experience. The mission of the class was “Learn, Make and Share”.

Let me tell you first about the environment we worked in and how the class was structured. The most exciting thing was that we rarely stayed in one place. What I mean by this is that we got to explore the majority of resources available on our campus with regard to “Making”. For example our classes took place in the MakerLab at the College of Business, the Beckman Institute, the FabLab and even the Deloitte office in Chicago. In each of this place we had an opportunity to learn and make something new such as 3D printing at the MakerLab, 3D scanning at the Beckman Institute and Arduino coding at the FabLab. However, not only we as students went to visit some places, but we also had some professionals come to our class and teach us something new. For example, we had an opportunity to learn working on Fusion 360 from real industrial design professionals. Also, we had student organizations such as Design for America as our guest speakers that helped us understand human centered design concept. So, as you can see this class encompasses so much diversity in learning and making.

Here is the picture of the FabLab I mentioned above. FYI the door is not easy to find.

IMG_5820

Now since I gave you a little bit of environment and structure of the class let me give you examples of things that we made during this semester and the implications of the learning and making processes. The class had a quite exciting start because the first thing that we made was ourselves. Let me clarify here, what we did is we scanned ourselves with a portable 3D scanner and then printed our sculpts on a 3D printer. I could never imagine that this was possible, so I was quite amazed with this experience. With this experience I realized that there could be many applications one of which I learned at the Beckman Institute. When our very own Alma Mater was sent for reconstruction two years ago, some folks at the Beckman Institute were able to 3D scan it and send it to an app that would allow the graduates to take the famous picture with the Alma Mater. Isn’t this amazing!

This is Travis who worked on the Alma Mater project and his giant 3D scanner @Beckman

797


As I mentioned above we spend some time at the FabLab. The Champaign-Urbana Community Fab Lab is an open and collaborative workshop space for computer-driven innovation, design and fabrication. Here, we were able to learn and make quite a few things. The FabLab has several sections such as electronics, textile & fabrics, laser engraving and 3D printing. I personally learned to work on Arduino at the electronics section, digital stitching at the textile & fabrics section and laser cutting at the laser engraving section. Each of these experiences gave me opportunity to learn new skills and look at some things differently. For example, with the knowledge we got from Arduino workshop my teammates and I were able to create a pillbox that was able to notify senior citizens with the LED light on Arduino. This idea was developed at the event called Make-a-thon that was organized by the FabLab community. This was a very exciting event where different teams were able to develop their ideas with regard to the “Senior accessibility” and create their prototypes. In addition, with the digital stitching and laser cutting I realized that it is possible to make personalized gifts to my friends and family. Overall, this experience at the FabLab really showed me that it is possible to create an make things that are both meaningful and affordable.

Here are some of my works at the FabLab.

10982905_954476817938530_6906218937898392464_o  IMG_20150419_215602 ard  IMG-20150407-WA0002


Now with this amazing experience that I have gotten from the Digital Making class there are certainly some take aways that made me think of how I can apply or further broaden my knowledge about this subject. First of all I really got interested in additive manufacturing which basically is 3D printing. More specifically, I started researching on how people can apply or already applying this knowledge to the construction industry. For example, in China there are already cases when people built houses using additive manufacturing concept (check this articles http://chinadailymail.com/2014/05/12/chinas-new-3-d-printed-houses/http://www.computerworld.com/article/2489664/emerging-technology/3d-printer-constructs-10-buildings-in-one-day-from-recycled-materials.html). I think this is truly amazing and soon potentially can become a normal thing. No one thought we could carry phones in our pockets 2-3 decades ago. So, I think 3D printed houses are similar in  that sense, it is hard to believe in it but it surely will become a reality.  Therefore, as I am thinking on becoming an entrepreneur, I believe the trends such as 3D printing will be important for me to keep an eye on in the coming future.

Additionally, many things that I learned in this class, especially the ones at the FabLab I think should become more popular in many places in the world. In particular, I think children from young age should be taught with this kind of skills and knowledge that will allow them think creatively and give opportunity to make things themselves. As a result this will allow to nurture a generation of makers, creators and innovators.

This was my experience at making things, are you ready to “Learn, Make and Share”?!

Learning the Ropes of Making

Digital Making has been a true experience for me.  Entering the class I had no idea what 3D printers were capable of doing and how the entire process worked.  What I also did not know was that Digital Making involved so much more then 3D printers, including, digital embroidery, laser etching, sewing, metal fabrication, arduinos, and 3D modeling.  My learning curve was established when in the first couple weeks of class we had a skype call with a Professor from Indiana University and she told us that grade school kids were learning by “making things”.  I was shocked to hear that young kids were learning tangible skills like sewing, 3D printing, crafting, etc.  My learning curve was established.  Starting off, I gained an understanding of 3D modeling and scanning, printed off my first 3D object and thought I had a solid base of knowledge.  What I did not understand was what separated my prints from all the others? Anyone can go on and download the print file and print the same exact thing.  From here on out, about week 3 or 4 of Digital Making, I decided I needed to add creativity and a special touch to my makings.  My first special design touch came while modeling and printing my upper body and head.  I made a major leap of faith and added my initials on my back! Wow what a crazy addition.

IMG_5215

My next test of design came with modeling in Autodesk Fusion 360.  We were challenged to model an object form scratch and incorporate skills used in our Fusion workshop.  I started with a cube and ended with a toothbrush holder.  Again, not super creative at all, but I measured it so it would only fit my specific toothbrush.  Making the holder specific to my toothbrush gave me a good feeling that I had design a perfect product for me and I felt the maker buzz because of that.  See toothbrush holder below:

Screen Shot 2015-05-08 at 6.15.45 PM

After working with Autodesk for a couple weeks, we visited Beckman’s 3D modeling lab. Looking back  I was not too found of working at Beckman because it was less hand ons then what the rest of the semester had in store.

After Beckman we entered into the Champaign-Urbana Fab Lab section of the class.  3 weeks at the Fab Lab allowed us to work on metals, arduinos, digital embroidery, and laser etching.  My experiences at the Fab Lab brought out the true “maker” in me and took my personal design to the next level.  The second week at the Fab Lab, digital embroidery, was were I truely felt like I had created a unique and well designed item.  To start, I chose an image of house off of google, imported it into paint and customized the image to my perfection.  I added a waving person in the window, changed to colors of the house to red, with brown accents, and gave it a brick style of stitching. See image below:

IMG_5216

I was pumped to have an item that felt so at home with me and personalized to my choice.  Next came laser etching, another creative experience for me.  I chose to start with a silhouette of the Chicago skyline and began modifying my image in InkScape.  I readjusted the color ratios at least five times until I felt it was perfect, deleted sail boats, and added the sun and a yacht.  I thought the best views of the Chicago skyline I have ever seen are when the sun is shining and tons of boats are out on the water.  Finally, I added a Cubs and Bulls logo to the back, another special touch.  Finishing the laser etch, I felt like a true maker and excited to have been able to be apart of such a cool experience. See the images below:

IMG_5218 IMG_5217

The final segment of the class was turning my 3D head model into a wall hanging and wrapping up my group project.  I decided to turn my 3D head model into a 3D printed wall hanging to have a displayable object from class in my apartment for everyone to see.  Here is a link further explaining the project: 3D Print a Wall Hanging of Your Head

The print turned out great, see the model below:

Screen Shot 2015-04-09 at 5.52.36 PM

Wrapping up the group project, 3D printing wheelchair racing gloves, was a lot of fun. Week after week it was exciting to hear about Arielle’s, project teammate and wheelchair racer, races using her new 3D printed gloves. Working with Sebastian, other project teammate, and Arielle gave me two other perspectives on how to go about 3D modeling and printing an object. The project was a success and will continue on as Arielle and the crew at Beckman, who 3D scanned her original gloves, works to 3D model the rest of the racing team.

Overall I have grown tremendously in how I approach projects.  After a semester long of making, I believe all my projects, whether for work or school, from here on out, should be given my personal design and touch.  The personal design I have nurtured and grown in Digital Making will stay with me forever and I better prepared to create anything from the ground up here on out.  Skills I learned about design and modeling can be applied to most anything in my future.  Looking forward, I want to 3D print items necessary to life, but that would usually be bought at the store.  For example, next time I need a clothes hanger, I can 3D print it instead of buying it at the store!

The Filament War of 2015

So bean prototype number 2 was a bit of a bust. The bean printed way too small, and the support material was impossible to remove from the center. We THINK we got the final product ready to rock though! We redid the cad model, again, making it a little bigger, and rounding it a bit more. Thankfully it’s a simple enough design that this process isn’t super tedious. With a new filament in hand, I marched on over to the FabLab to put an end to it all.

The new filament was a super-cool flexible filament known as Filaflex, by Recreus, a company out of Spain. The diameter of the filament was too thick for the Makerbots, so this was a job for the FabLab team. I brought it in, and we did our research. We had to download the proper settings for it, and we spent forever figuring out perfect extrusion temperature, how to make it work, the best way to orient the figure, and then we pressed the big “PRINT” button, and waited. Problem, it didn’t stick to the bed. By that point, the lab was closing and we had to reconvene the next day.

Upon reconvening, they had broken the glass bed with a different print in the day and the glass they replaced it with was just too big. We made it work and got it leveled, struggled with the extrusion temperatures, and again, the lab closed. I promise I wasn’t going last minute, this process just ended up being super lengthy. In the end, we couldn’t make the filament work in time for Tuesday’s class. I’m heading back today to continue the battle and hopefully, we’ll have a squishier version of the gripping bean that works!

Reflection Week 15

What a semester!

Tuesday we will be having our big show and tell event to share the variety of our learning in Digital Making Seminar with special guests from the University and the community. I think the visitors to the MakerLab will be quite impressed with our work and excited to watch the programming at the MakerLab grow in the coming semesters.

The unique thing about DMS this semester is the variety of learning that has taken place. Though we were all in the same place on a weekly basis, we all had our own tracks in terms of our semester projects and direction we would go with for each lesson. I personally found myself exploring the industrial applications of 3D printing when I took Deloitte University’s “3D Opportunity” course that broke down the different ways that additive manufacturing is effecting the business world. It was neat to be able ot juxtapose the business savvy I picked up in that course with the activities I participated in with DMS. In particular, I got a strong feeling as to how these technologies are empowering and enabling the everyday maker when I got to use tools like 3D printers, 3D scanners on iPads, lazer cutters and electronic stitching machines. These technologies are becoming increasingly cheap, easy to use and are decentralizing the very nature of manufacturing.

The best  part about this course is that I’ve been able to learn from the projects and tracks of others too! Anyways, here is a video I made for the course. Figured it’d be a good way to get other people on board for future semesters 🙂


Week 15 Reflection

During this week’s lecture, the class continued on finishing individual’s final projects. My team was almost done. Instead of updating our project, I would like to share some information about a special 3D printer with you. It’s called Cocojet. 3D Systems released it on January 6, 2015 at Rock Hill, California. According to 3D Systems, Cocojet is a chocolate 3D printer developed in collaboration with The Hershey Company, at the 2015 International CES, at Sands Expo, booth 72225. Ideal for the baker or chocolatier, the CocoJet prints custom designs in dark, milk or white chocolate. Here’s the look:

cc  Impresora_Chocolate Screen-Shot-2015-01-14-at-8.17.34-AM

It looks like a Makerbot to me, which helps me to imagine how it works. Sometimes, I felt addict to chocolate. If I had a Cocojet at home, i would make chocolate with different shapes, tastes, and sizes. It will make the process of producing chocolate become efficient, easy, and fun. Maybe you are also interested in making chocolate with 3D print technology, please check 3D Systems website and look for more news about Cocojet and other latest 3D printer.

http://www.3dsystems.com/de


Digital Making Project Presentations

Please join us on Tuesday May 5th from 3:00 to 4:45 pm in BIF  Room 2001, for presentations from students in the first Digital Making class. Come find out how a hand’s on approach to learning by making, allows students to engage in self directed learning. Some of the interesting projects you will hear about are listed below.

  • Wheelchair racing glove: Arielle Rausin, a student in the course, is a wheelchair racer, who needs custom molded gloves while racing. She 3DScanned and  printed one and now is developing workflows to help the entire team. Thanks to Travis at Beckman institute and Deana for providing support for this project.
  • Lending a helping (3D printed) hand for Enable the Future project.
  • A Micro controller based medicine box that reminds seniors to take medicine ( developed as part of our participation in the CU Make event, by 3 business majors with no experience in micro controllers)
  • A Silicon grip helper for seniors with weak arm muscles ( CU Make event)
  • Mathematica and 3D Printing come together for some mathematical art
  • A Brain –  3D Printed from an MRI Scan
  • Science Fiction come to life to support a book project(by our Journalism student)
  • Learning Pathways in Digital Making
  • Several other individual projects using arduinos, laser cutters and even digital embroidery, which the students loved. These were made at the CU Fab Lab (Thanks for Jeff Ginger and FabLab staff for coordinating the sessions, and to Lisa Bievenue for sponsoring our visits there)

This course is the second in a series of courses offered at the Lab. Aric Rindfleisch leads the Making Things course, which had a successful debut last spring, and had tremendous interest this Spring (with 75 applicants for 21 spots). We have now moved the Digital Making course to the Fall, and are accepting applications. Please forward this invitation to attend the presentation to any other interested stakeholders(students, faculty/staff, administrators, community members). Refreshments will be provided.

RSVP at http://goo.gl/forms/VqNSDEHzeJ