Optical Character Recognition (OCR) is a powerful tool to transform scanned, static images of text into machine-readable data, making it possible to search, edit, and analyze text. If you’re using OCR, chances are you’re working with either ABBYY FineReader or Adobe Acrobat Pro. However, both ABBYY and Acrobat are propriety software with a steep price tag, and while they are both available in the Scholarly Commons, you may want to perform OCR beyond your time at the University of Illinois.
Thankfully, there’s a free, open source alternative for OCR: Tesseract. By itself, Tesseract only works through the command line, which creates a steep learning curve for those unaccustomed to working with a command-line interface (CLI). Additionally, it is fairly difficult to transform a jpg into a searchable PDF with Tesseract.
Thankfully, there are many free, open source programs that provide Tesseract with a graphical user interface (GUI), which not only makes Tesseract much easier to use, some of them come with layout editors that make it possible to create searchable PDFs. You can see the full list of programs on this page.
In this post, I will focus on one of these programs, gImageReader, but as you can see on that page, there are many options available on multiple operating systems. I tried all of the Windows-compatible programs and decided that gImageReader was the closest to what I was looking for, a free alternative to ABBYY FineReader that does a pretty good job of letting you correct OCR mistakes and exporting to a searchable PDF.
Installation
gImageReader is available for Windows and Linux. Though they do not include a Mac compatible version in the list of releases, it may be possible to get it to work if you use a package manager for Mac such as Homebrew. I have not tested this though, so I do not make any guarantees about how possible it is to get a working version of gImageReader on Mac.
To install gImageReader on Windows, go to the releases page on Windows. From there, go to the most recent release of the program at the top and click Assets to expand the list of files included with the release. Then select the file that has the .exe extension to download it. You can then run that file to install the program.
Manual
The installation of gImageReader comes with a manual as an HTML file that can be opened by any browser. As of the date of this post, the Fossies software archive is hosting the manual on its website.
Setting OCR Mode
gImageReader has two OCR modes: “Plain Text” and “hOCR, PDF”. Plain Text is the default mode and only recognizes the text itself without any formatting or layout detection. You can export this to a text file or copy and paste it into another program. This may be useful in some cases, but if you want to export a searchable PDF, you will need to use hOCR, PDF mode. hOCR is a standard for formatting OCR text using either XML or HTML and includes layout information, font, OCR result confidence, and other formatting information.
To set the recognition to hOCR, PDF mode, go to the toolbar at the top. It includes a section for “OCR mode” with a dropdown menu. From there, click the dropdown and select hOCR, PDF:
This is the toolbar for gImageReader. You can set OCR mode by using the dropdown that is the third option from the right.
Adding Images, Performing Recognition, and Setting Language
If you have images already scanned, you can add them to be recognized by clicking the Add Images button on the left panel, which looks like a folder. You can then select multiple images if you want to create a multipage PDF. You can always add more images later by clicking that folder button again.
On that left panel, you can also click the Acquire tab button, which allows you to get images directly from a scanner, if the computer you’re using has a scanner connected.
Once you have the images you want, click the Recognize button to recognize the text on the page. Please note that if you have multiple images added, you’ll need to click this button for every page.
If you want to perform recognition on a language other than English, click the arrow next to Recognize. You’ll need to have that language installed, but you can install additional languages by clicking “Manage Languages” in the dropdown appears. If the language is already installed, you can go to the first option listed in the dropdown to select a different language.
Viewing the OCR Result
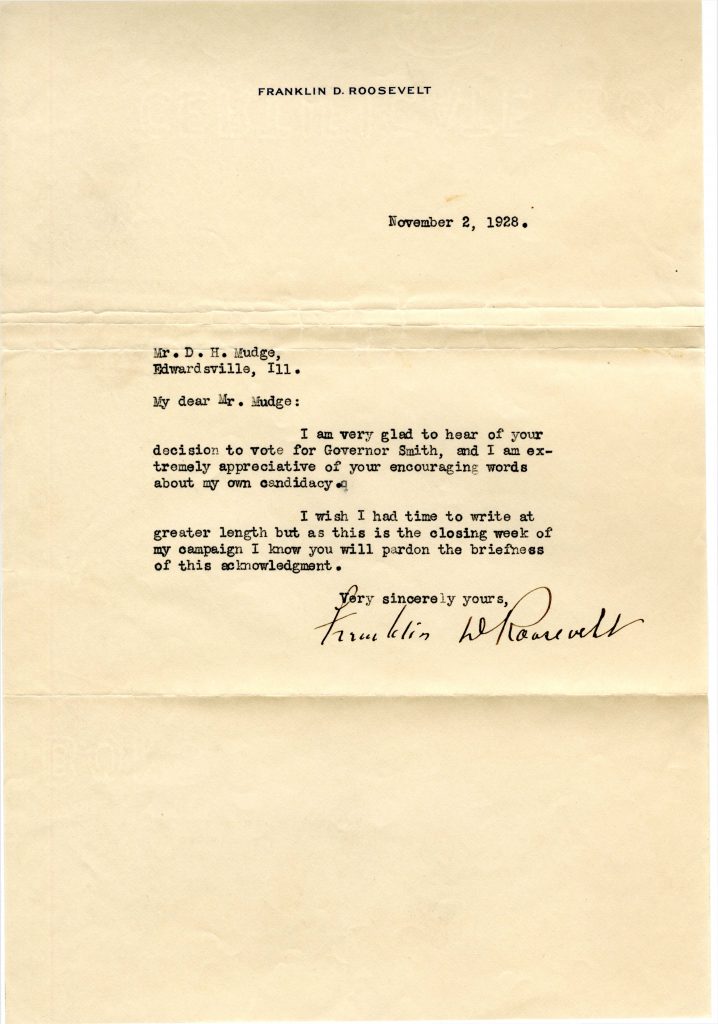
In this example, I will be performing OCR on this letter by Franklin D. Roosevelt:

This 1928 letter from Franklin D. Roosevelt to D. H. Mudge Sr. is courtesy of Madison Historical: The Online Encyclopedia and Digital Archive for Madison County Illinois. https://madison-historical.siue.edu/archive/items/show/819
Once you’ve performed OCR, there will be an output panel on the right. There are a series of buttons above the result. Click the button on the far right to view the text result overlaid on top of the image:

Here is the the text overlaid on an image of the original scan. Note how the scan is slightly transparent now to make the text easier to read.
Correcting OCR
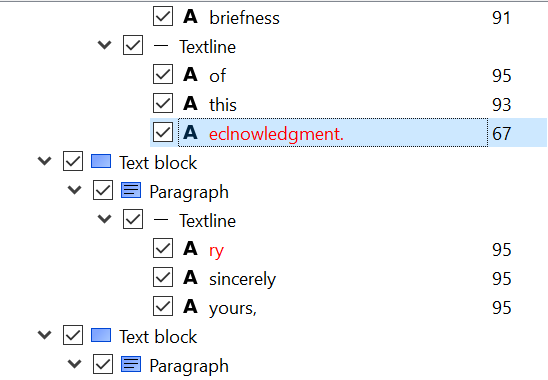
The OCR process did a pretty good job with this example, but it there are a handful of errors. You can click on any of the words of text to show them on the right panel. I will click on the “eclnowledgment” at the end of the letter to correct it. It will then jump to that part of the hOCR “tree” on the right:
Note in this screenshot I have clicked the second button from the right to show the confidence values, where the higher the number, the higher the confidence Tesseract has with the result. In this case, it is 67% sure that eclnowledgement is correct. Since it obviously isn’t correct, we can type new text by double-clicking on the word in this panel and type “acknowledgement.” You can do this for any errors on the page.
Other correction tips:
- If there are any regions that are not text that it is still recognizing, you can right click them on the right and delete them.
- You can change the recognized font and its size by going to the bottom area labeled “Properties.” Font size is controlled by the x_fsize field, and x_font has a dropdown where you can select a font.
- It is also possible to change the area of the blue word box once it is selected, simply by clicking and dragging the edges and corners.
- If there is an area of text that was not captured by the recognition, you can also right click in the hOCR “tree” to add text blocks, paragraphs, textlines, and words to the document. This allows you to draw a box on image and then type what the text says.
Exporting to PDF
Once you are done making OCR corrections, you can export to a searchable PDF. To do so, click the Export button above the hOCR “tree,” which is the third button from the left. Then, select export to PDF. It then gives you several options to set the compression and quality of the PDF image, and once you click OK, it should export the PDF.
Conclusion
Unfortunately, there are some limitations to gImageViewer, as can often be the case with free, open source software. Here are some potential problems you may have with this program:
- While you can add new areas to recognize with OCR, there is not a way to change the order of these elements inside the hOCR “tree,” which could be an issue if you are trying to make the reading order clear for accessibility reasons. One potential workaround could be to use the Reading Order options on Adobe Acrobat, which you can read about in this libguide.
- You cannot show the areas of the document that are in a recognition box unless you click on a word, unlike ABBYY FineReader which shows all recognition areas at once on the original image.
- You cannot perform recognition on all pages at once. You have to click the recognition button individually for each page.
- Though there are some image correction options to improve OCR, such as brightness, contrast, and rotation, it does not have as many options as ABBYY FineReader.
gImageViewer is not nearly as user friendly or have all of the features that ABBYY FineReader has, so you will probably want to use ABBYY if it is available to you. However, I find gImageViewer a pretty good program that can meet most general OCR needs.


