
 The Glossary activity is more powerful than it may appear. Not only can it be used to create a simple glossary of vocabulary terms, but with a few small changes to the settings, it can also be transformed into a Frequently Asked Questions page or even a crowd sourced encyclopedia.
Glossary Options
› General
› Entries
› Appearance
› RSS
› Grade
› Common Module Settings
› Restrict Access
› Activity Completion
Glossary Module
› Add Categories
› Add Entries
› Approve, Edit, Delete and Export Entries
› Search
› Browse Alphabetically
› Browse by Category
› Browse by Date
› Browse by Author
› Print the Glossary
General
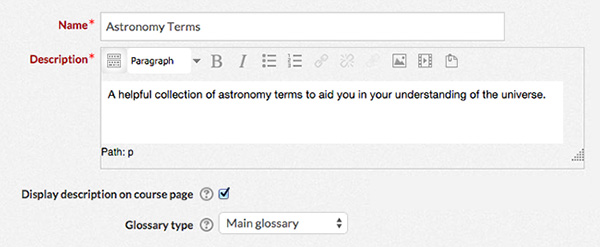
- Type a name for your glossary into the “Name” text box.
- Type a description of your glossary into the “Description” text box. If you plan to have students submit their own entries, this is a good place to provide them with instructions.
- If you want to display the description for the glossary on your course site, check the “Display description on course page” box.
- Use the Glossary type dropdown list to pick a glossary type. The glossary types are described below:
Main glossary – Serves as the main glossary for the course. You can only have one main glossary per course.
Secondary – You can have multiple secondary glossaries. The entries in the secondary glossaries can be exported to the main glossary. See Approve, Edit, Delete and Export Entries for more information.
Entries
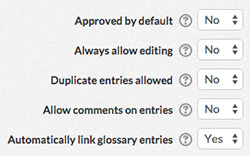
- Use the “Approved by default” dropdown list to determine whether student submitted entries must be approved by the instructor before everyone can see them.
- Use the “Always allow editing” dropdown list to determine whether students can edit their entries at any time or if they will only have a 30 minute time window to edit their entries after submitting to the glossary.
- Use the “Duplicate entries allowed” dropdown list to determine whether multiple entries with the same name can be submitted.
- Use the “Allow comments on entries” dropdown list to determine whether students can comment on entries.
- Selecting “Yes” in the “Automatically link glossary entries” dropdown list will add an extra option when entries are created. The option makes it possible for glossary words to be automatically linked to your glossary whenever they show up elsewhere on the course site. See Add Entries for more information.
Appearance
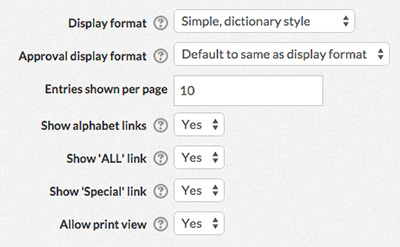
- Use the “Display format” dropdown list to change the appearance of your glossary. This option can also be used to transform your glossary into an encyclopedia or Q and A page. The available display formats are described below:
Continuous without author – Lists each entry’s name and definition. Image attachments are displayed as links at the top of the entry.
Encyclopedia – Lists each entry’s name and definition, author name and profile image, and the date and time that the entry was last edited. Image attachments are displayed in full above the entry definition.
Entry List – Lists the entry name as a link. Clicking on the link displays the entry’s definition on a separate page. Image attachments are displayed as links above the entry definition.
FAQ – The word “Question” appears before the entry name and the word “Answer” appears before the definition. The date and time that the entry was last edited is also displayed. Image attachments are displayed as links next to the question.
Full with author – Lists each entry’s name and definition, author name and profile image, and the date and time that the entry was last edited. Image attachments are displayed as links next to the entry name.
Full without author – Lists each entry’s name and definition and the date and time that the entry was last edited. Image attachments are displayed as links next to the entry name.
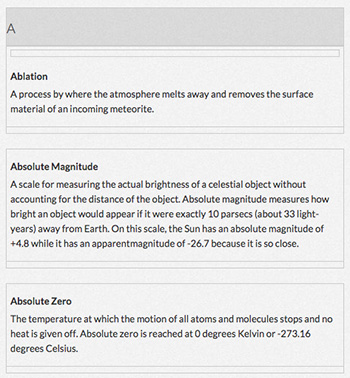
Simple, dictionary style – Lists each entry’s name and definition. Image attachments are displayed as links at the top of the entry. - If you would like the entries to display in a different format while you are approving them, choose that format from the “Approval display format” dropdown list. Otherwise, select “Defult to same as display format.”
- Type in the number of entries to be shown on each page in the “Entries shown per page” text box.
- Use the “Show alphabet links” dropdown list to determine whether students can browse entries by clicking on the letters of the alphabet.
- Use the “Show ‘ALL’ link” dropdown list to determine whether the “Show all” link is displayed when browsing by category.
- Use the “Show ‘Special’ link” dropdown list to determine whether the “Special” link is displayed when browsing by alphabet. Clicking on the “Special” link displays entries starting with special characters, such as @ and #.
- Use the “Allow print view” dropdown list to determine whether students are provided with a link to a printer-friendly version of the glossary.
RSS
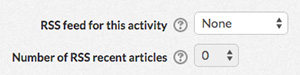
- Use the “RSS feed for this activity” dropdown list to enable RSS feeds for your forum Discussions or posts.
- If using RSS feeds, use the “Number of RSS recent articles” to limit the number of articles that appear in the RSS feed.
Grade
Use the “Grade category” dropdown list to choose the grade book category for this activity. See Grading Activities for more information.
Common Module Settings
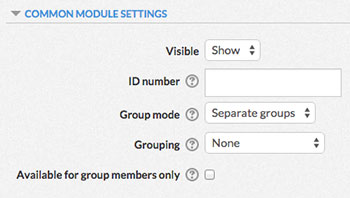 Choose whether or not to hide or show the Assignment module using the “Visible” dropdown box.
- If desired, type a number into the “ID number” text box. Setting an ID number provides a way of identifying the activity for grade calculation purposes.
- Choose a group mode for the activity. The different group modes are described below:
No groups – Students will not be separated into groups for the activity. In interactive activities, students will see the contributions of every class member.
Separate groups – Students will be separated into groups for the activity. In interactive activities, students can only contribute to their group and only view their group’s contributions.
Visible groups – Students will be separated into groups for the activity. In interactive activities, students will see the contributions of every class member, but they can only contribute to their group. - Use the “Grouping” dropdown list to determine the grouping for the activity. See Groups and Groupings for more information.
- To only make the activity available to students assigned to groups within the selected grouping, check the “Available for group members only” box. See Groups and Groupings for more information.
Restrict Access
Use the restrict Access settings to control when and how students can use the activity. See Restricting Access to Content for more information.
Activity Completion
Use the Activity Completion settings to track the completion of the activity. For more information, see Activity Completion.
Add Categories
- You may decide that you want to divide your glossary entries up into specific categories. If so, you should create these categories before you begin adding entries.
- Click on the “Browse by category” button at the top of the module.

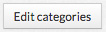
- Click the “Edit categories” button on the left, then click “Add Category”
- Type the category name into the “Name” text box.
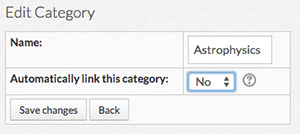
- If you want the category name to appear as a link whenever it is used elsewhere in the course, check the “Automatically link this category” box. When a student clicks on the link, they will be taken to the page for that category in the glossary.
- Click the “Save Changes” button.
- Your categories will appear in a list after you create them. To delete or edit a category, click the X or gear icon to the right of the category name.

- When you are finished adding categories, click the “Back” button on the bottom right.

Add Entries
- Click the “Add a new entry” button at the top of the module.
- Type a name for the entry in the “Concept” text box.
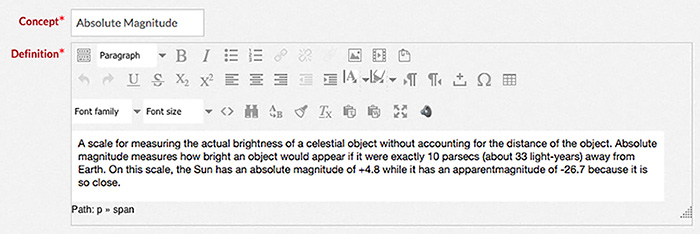
- Type a definition for the entry in the “Definition” content manager. See Content Manager for more information.
- If you have added categories to your glossary, you will be able to select them from the “Categories” list. You can select more than one category from the list at a time by holding down the COMMAND key (on a Mac) or the CONTROL key (on a PC) while clicking on a category name. For instructions on adding categories, see Add Categories.
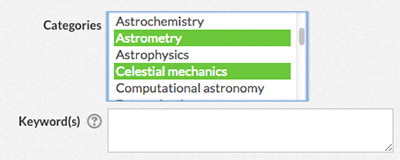
- Type key words for the glossary term into the “Keyword(s) text box. Enter each keyword on a new line (not separated by commas).
If the entry is auto-linked, any keywords will also be auto-linked.
- If desired, add a file attachment to the entry using the File Uploader. See File Uploader for more information.
Image attachments will display differently depending on the Display Format setting for your glossary. See Appearance for more information.
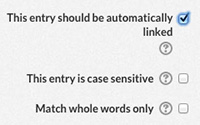 Check the “This entry should be automatically linked” box if you want the entry name to appear as a link whenever it is used elsewhere on the course site. Clicking on the link will take the user to the glossary entry.
- Check the “This entry is case sensitive” box if an auto-link should appear only when it matches the exact upper and lower case letters of an entry.
- Check the “Match whole words only” box if an auto-link should appear only when the whole word is used on its own. For example, a glossary entry named “construct” will not create a link inside the word “constructivism” if this box is checked.
- Click the “Save changes” button at the bottom.
Approve, Edit, Delete and Export Entries
- To see entries awaiting approval, click on the “Waiting approval” link in the upper right of the module.

- In the upper right corner of an entry, click on the check-mark icon to approve the entry.

- Click on the slashed circle icon below an entry to undo the approval of the entry.
- Click on the gear icon below an entry to edit it.
- Click on the X icon below an entry to delete it.
- To export a secondary glossary entry to the main glossary, click on the plus icon below the entry and press the “Continue” button.
- To remove an exported entry from the main glossary, click on the red minus icon below the entry as it appears in the main glossary.
Search
![]()
- Type the word or phrase you want to search for in the text box at the top of the module.
- If you only want to search entry names and not descriptions, uncheck the “Search full text” box.
- Click the “Search” button.
Browse Alphabetically
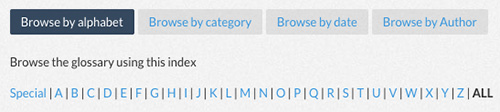
- Click the “Browse by alphabet” button at the top of the module.
- Click on the letters of the alphabet to view entries that begin with that letter.
- Click on the “Special” link to view entries that begin with a special character such as @ or #.
- Click on the “ALL” link to view all entries in alphabetical order.
Browse by Category
![]()
- Click the “Browse by category” button at the top of the module.
- Use the dropdown list on the right to narrow the entries by category. To add categories, see Add Categories.
when browsing by “All categories”, entries that belong to multiple categories will only be displayed once in a single category. To turn this option off, see the Appearance setting.
Browse by date

- Click the “Browse by date” button at the top of the module.
- Click the “By last update” and “By creation date” links to sort the entries.
Browse by author
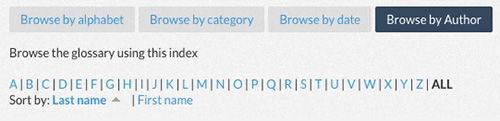
- Click the “Browse by author” button at the top of the module.
- Click on the letters of the alphabet to display entries created by authors’ whose names begin with that letter.
- Click the “Last name” and “First name” links to choose whether the alphabet letters correspond with authors’ last names or first names.
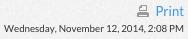
Print the Glossary
- Click the “Printer-friendly version” link at the top right of the module.

- A printer friendly version will be displayed.
If you have been searching or browsing the glossary, only the most recent searching or browsing results will be available for you to print.
- Click the “Print” button in the upper right and follow the instructions displayed by your web browser.
Working with Activities and Resources
› Add an Activity or Resource
› Move or Arrange an Activity or Resource
› Rename an Activity or Resource
› Edit the Settings of an Activity or Resource
› Hide or Show an Activity or Resource
› Copy an Activity or Resource
› Allow a Specific User Certain Permissions When Using an Activity or Resource
› Delete an Activity or Resource
› Change the Group Mode of an Activity or Resource
Add an Activity or Resource
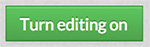
- In the upper right, click on the green button that says “Turn editing on”.
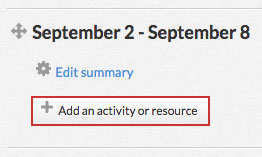
- Locate the section where you want to add an activity or resource. At the bottom of the section, click on the button that says “Add an activity or resource”
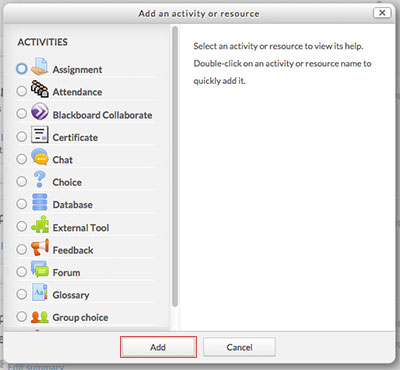
- A window will pop up with a list of activities and resources. When you click on one of the items in the left column, a description will appear in the right column. Choose the activity or resource you want and click the “Add” button.
Move or Arrange an Activity or Resource
To rearrange the order of an activity or resource:
- Click on the compass arrows icon next to the title of the activity or resource you want to move and hold down the mouse button.

- Drag the section up or down to move it to a new location.
- Release the mouse button.
To add or remove an indentation to an activity or resource:
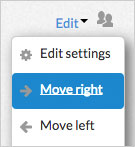
- Click on the “Edit” button to the left of the activity or resource.
- From the drop-down list, choose “Move right” or “Move left” next to the arrow icons.
Rename an Activity or Resource
- Click on the pen icon to the right of the activity or resource’s name.

- Type in a new name for the activity or resource
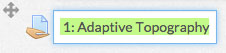
- Press enter to save or escape to cancel.
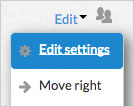
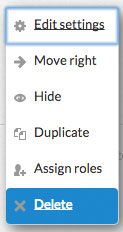
Edit the Settings of an Activity or Resource
- Click on the “Edit” button to the right of the activity or resource.
- From the dropdown list, choose “Edit settings” next to the gear icon to hide the activity or resource.
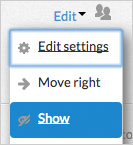
Hide or Show an Activity or Resource
- Click on the “Edit” button to the right of the activity or resource.
- From the dropdown list, choose “Hide” next to the eye icon to hide the activity or resource.
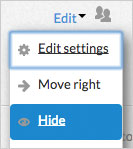
- Once the activity or resource has been hidden, return to the “Edit” menu and choose “Show” to show it again.
Copy an Activity or Resource
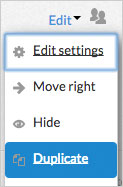
- Click on the “Edit” button to the right of the activity or resource.
- From the dropdown list, choose “Duplicate” next to the pages icon.
Allow a Specific User Certain Permissions When Using an Activity or Resource
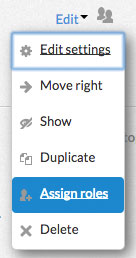
- Click on the “Edit” button to the right of the activity or resource.

- From the dropdown list, choose “Assign roles” next to the user icon.
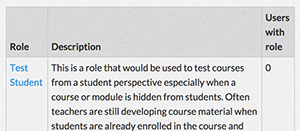
- Choose the type of role you want to assign to a specific user. The details of that role are listed in the “Description” column.
- Choose the specific user from your list of potential users on the right. Click the arrow buttons to add or remove them to the “Existing Users” list on the left. You can also use the search boxes at the bottom to find a specific user.

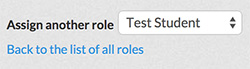
- The names in the “Existing Users” list will be assigned the role you chose on the previous page. When you’re finished, you can choose another roll to add from the drop-down list at the bottom, or you can return to the previous page by clicking on “Back to the list of all roles”.
Delete an Activity or Resource
- Click on the “Edit” button to the right of the activity or resource.
- From the dropdown list, choose “Delete” next to the X icon.
Change the Group Mode of an Activity or Resource
- Click on the user icon next to the “Edit” button of the activity or resource.

- Every time you click, the icon will change. Each icon represents a different group mode. The different group modes are described below:
 No groups – Students will not be separated into groups for the activity. In interactive activities, students will see the contributions of every class member.
 Separate groups – Students will be separated into groups for the activity. In interactive activities, students can only contribute to their group and only view their group’s contributions.
 Visible groups – Students will be separated into groups for the activity. In interactive activities, students will see the contributions of every class member, but they can only contribute to their group.